- Android的Activity加载方式实例分析
- Android拦截外拨电话程序示例
- 用Android Location获取当前地理位置的方法
- Android重写View并自定义属性实例分析
- Android编程之监听器用法实例分析
- Android应用开发中模拟按下HOME键的效果(实现代码)
- Android中获取手机屏幕大小的方法
- Android编程判断SD卡是否存在及使用容量查询实现方法
- Android如何实现锁屏状态下弹窗
- Android拍照或从图库选择图片并裁剪
- Android开发中setContentView和inflate的区别分析
- Android中Dialog去黑边的方法
- Android AutoCompleteTextView连接数据库自动提示的方法(附demo源码下载)
- Android Fragment的使用方法(翻译)
- Android编程实现获取标题栏、状态栏的高度、屏幕大小及模拟Home键的方法
- Android实现listview动态加载数据分页的两种方法
- Android加载图片内存溢出问题解决方法
- Android中自定义对话框(Dialog)的实例代码
- Android4.4下MediaProvider无法向外置SD卡中文件写数据的解决方法
- android dialog边框去除白色边框实现思路及代码
- TextVie获取显示字符串的宽度之Android开发
- Android手势滑动实现ImageView缩放图片大小
- Android编程之控件ListView使用方法
- Android实现系统语言切换功能
- Android客户端软件开发_13、多线程断点续传之多线程
- Android中修改设备权限的方法
- Android UI实时预览和编写的各种技巧
- 深入Android线程的相关问题解惑
- Android实现检查并下载APK更新、安装APK及获取网络信息的方法
- android sdk安装及开发环境部署
Android中使用BitmapShader类来制作各种图片的圆角
public BitmapShader(Bitmap bitmap,Shader.TileMode tileX,Shader.TileMode tileY)
调用这个类来产生一个画有一个位图的渲染器(Shader)。
bitmap:在渲染器内使用的位图
(1)tileX:The tiling mode for x to draw the bitmap in. 在位图上X方向花砖模式
(2)tileY:The tiling mode for y to draw the bitmap in. 在位图上Y方向花砖模式
TileMode:(一共有三种)
(1)CLAMP:如果渲染器超出原始边界范围,会复制范围内边缘染色。
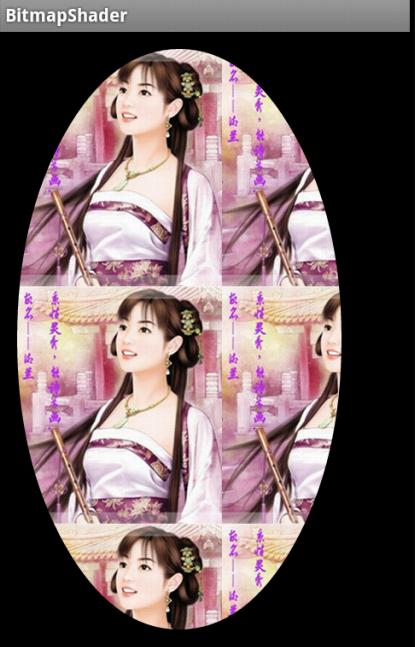
(2)REPEAT:横向和纵向的重复渲染器图片,平铺。
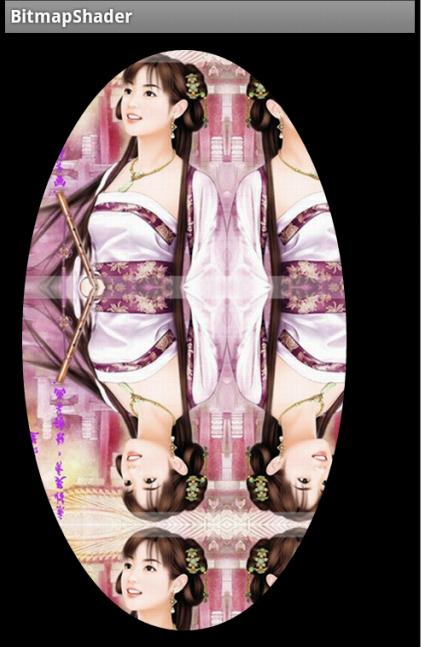
(3)MIRROR:横向和纵向的重复渲染器图片,这个和REPEAT 重复方式不一样,他是以镜像方式平铺。
还是不太明白?那看一下效果图吧!


对于我们的圆角,以及圆形,我们设置的模式都是CLAMP ,但是你会不会会有一个疑问:
view的宽或者高大于我们的bitmap宽或者高岂不是会拉伸?
嗯,我们会为BitmapShader设置一个matrix,去适当的放大或者缩小图片,不会让“ view的宽或者高大于我们的bitmap宽或者高 ”此条件成立的。
到此我们的原理基本介绍完毕了,拿到drawable转化为bitmap,然后直接初始化BitmapShader,画笔设置Shader,最后在onDraw里面进行画圆就行了。
基本用法及实例
首先就来看看利用BitmapShader实现的圆形或者圆角。
我们这里直接继承ImageView,这样大家设置图片的代码会比较熟悉;但是我们需要支持两种模式,那么就需要自定义属性了:
1、自定义属性
values/attr.xml
<?xml version="1.0" encoding="utf-8"?>
<resources>

 <attr name="borderRadius" format="dimension" />
 <attr name="type">
  <enum name="circle" value="0" />
  <enum name="round" value="1" />
 </attr>


 <declare-styleable name="RoundImageView">
  <attr name="borderRadius" />
  <attr name="type" />
 </declare-styleable>

</resources>
我们定义了一个枚举和一个圆角的大小borderRadius。
2、获取自定义属性
public class RoundImageView extends ImageView
{

 /**
  * 图片的类型,圆形or圆角
  */
 private int type;
 private static final int TYPE_CIRCLE = 0;
 private static final int TYPE_ROUND = 1;

 /**
  * 圆角大小的默认值
  */
 private static final int BODER_RADIUS_DEFAULT = 10;
 /**
  * 圆角的大小
  */
 private int mBorderRadius;

 /**
  * 绘图的Paint
  */
 private Paint mBitmapPaint;
 /**
  * 圆角的半径
  */
 private int mRadius;
 /**
  * 3x3 矩阵,主要用于缩小放大
  */
 private Matrix mMatrix;
 /**
  * 渲染图像,使用图像为绘制图形着色
  */
 private BitmapShader mBitmapShader;
 /**
  * view的宽度
  */
 private int mWidth;
 private RectF mRoundRect;

 public RoundImageView(Context context, AttributeSet attrs)
 {
  super(context, attrs);
  mMatrix = new Matrix();
  mBitmapPaint = new Paint();
  mBitmapPaint.setAntiAlias(true);

  TypedArray a = context.obtainStyledAttributes(attrs,
    R.styleable.RoundImageView);

  mBorderRadius = a.getDimensionPixelSize(
    R.styleable.RoundImageView_borderRadius, (int) TypedValue
      .applyDimension(TypedValue.COMPLEX_UNIT_DIP,
        BODER_RADIUS_DEFAULT, getResources()
          .getDisplayMetrics()));// 默认为10dp
  type = a.getInt(R.styleable.RoundImageView_type, TYPE_CIRCLE);// 默认为Circle

  a.recycle();
 }
可以看到我们的一些成员变量,基本都加了注释;然后在构造方法中获取了我们的自定义属性,以及部分变量的初始化。
3、onMeasure
@Override
 protected void onMeasure(int widthMeasureSpec, int heightMeasureSpec)
 {
  Log.e("TAG", "onMeasure");
  super.onMeasure(widthMeasureSpec, heightMeasureSpec);

  /**
   * 如果类型是圆形,则强制改变view的宽高一致,以小值为准
   */
  if (type == TYPE_CIRCLE)
  {
   mWidth = Math.min(getMeasuredWidth(), getMeasuredHeight());
   mRadius = mWidth / 2;
   setMeasuredDimension(mWidth, mWidth);
  }

 }
我们复写了onMeasure方法,主要用于当设置类型为圆形时,我们强制让view的宽和高一致。
接下来只剩下设置BitmapShader和绘制了
4、设置BitmapShader
/**
  * 初始化BitmapShader
  */
 private void setUpShader()
 {
  Drawable drawable = getDrawable();
  if (drawable == null)
  {
   return;
  }

  Bitmap bmp = drawableToBitamp(drawable);
  // 将bmp作为着色器,就是在指定区域内绘制bmp
  mBitmapShader = new BitmapShader(bmp, TileMode.CLAMP, TileMode.CLAMP);
  float scale = 1.0f;
  if (type == TYPE_CIRCLE)
  {
   // 拿到bitmap宽或高的小值
   int bSize = Math.min(bmp.getWidth(), bmp.getHeight());
   scale = mWidth * 1.0f / bSize;

  } else if (type == TYPE_ROUND)
  {
   // 如果图片的宽或者高与view的宽高不匹配,计算出需要缩放的比例;缩放后的图片的宽高,一定要大于我们view的宽高;所以我们这里取大值;
   scale = Math.max(getWidth() * 1.0f / bmp.getWidth(), getHeight()
     * 1.0f / bmp.getHeight());
  }
  // shader的变换矩阵,我们这里主要用于放大或者缩小
  mMatrix.setScale(scale, scale);
  // 设置变换矩阵
  mBitmapShader.setLocalMatrix(mMatrix);
  // 设置shader
  mBitmapPaint.setShader(mBitmapShader);
 }
在setUpShader中,首先对drawable转化为我们的bitmap;
然后初始化
mBitmapShader = new BitmapShader(bmp, TileMode.CLAMP, TileMode.CLAMP);
接下来,根据类型以及bitmap和view的宽高,计算scale;
关于scale的计算:
(1)圆形时:取bitmap的宽或者高的小值作为基准,如果采用大值,缩放后肯定不能填满我们的圆形区域。然后,view的mWidth/bSize ; 得到的就是scale。
(2)圆角时:因为设计到宽/高比例,我们分别getWidth() * 1.0f / bmp.getWidth() 和 getHeight() * 1.0f / bmp.getHeight() ;最终取大值,因为我们要让最终缩放完成的图片一定要大于我们的view的区域,有点类似centerCrop;
(3)比如:view的宽高为10*20;图片的宽高为5*100 ; 最终我们应该按照宽的比例放大,而不是按照高的比例缩小;因为我们需要让缩放后的图片,自定大于我们的view宽高,并保证原图比例。
有了scale,就可以设置给我们的matrix;
然后使用mBitmapShader.setLocalMatrix(mMatrix);
最后将bitmapShader设置给paint。
关于drawable转bitmap的代码:
/**
  * drawable转bitmap
  *
  * @param drawable
  * @return
  */
 private Bitmap drawableToBitamp(Drawable drawable)
 {
  if (drawable instanceof BitmapDrawable)
  {
   BitmapDrawable bd = (BitmapDrawable) drawable;
   return bd.getBitmap();
  }
  int w = drawable.getIntrinsicWidth();
  int h = drawable.getIntrinsicHeight();
  Bitmap bitmap = Bitmap.createBitmap(w, h, Bitmap.Config.ARGB_8888);
  Canvas canvas = new Canvas(bitmap);
  drawable.setBounds(0, 0, w, h);
  drawable.draw(canvas);
  return bitmap;
 }
最后我们会在onDraw里面调用setUpShader(),然后进行绘制。
5、绘制
到此,就剩下最后一步绘制了,因为我们的范围,以及缩放都完成了,所以真的只剩下绘制了。
@Override
 protected void onDraw(Canvas canvas)
 {
  if (getDrawable() == null)
  {
   return;
  }
  setUpShader();

  if (type == TYPE_ROUND)
  {
   canvas.drawRoundRect(mRoundRect, mBorderRadius, mBorderRadius,
     mBitmapPaint);
  } else
  {
   canvas.drawCircle(mRadius, mRadius, mRadius, mBitmapPaint);
   // drawSomeThing(canvas);
  }
 }

 @Override
 protected void onSizeChanged(int w, int h, int oldw, int oldh)
 {
  super.onSizeChanged(w, h, oldw, oldh);
  // 圆角图片的范围
  if (type == TYPE_ROUND)
   mRoundRect = new RectF(0, 0, getWidth(), getHeight());
 }
绘制就很简单了,画个圆,圆角矩形什么的。圆角矩形的限定范围mRoundRect在onSizeChanged里面进行了初始化。
6、状态的存储与恢复
当然了,如果内存不足,而恰好我们的Activity置于后台,不幸被重启,或者用户旋转屏幕造成Activity重启,我们的View应该也能尽可能的去保存自己的属性。
状态保存什么用处呢?比如,现在一个的圆角大小是10dp,用户点击后变成50dp;当用户旋转以后,或者长时间置于后台以后,返回我们的Activity应该还是50dp;
我们简单的存储一下,当前的type以及mBorderRadius
private static final String STATE_INSTANCE = "state_instance";
 private static final String STATE_TYPE = "state_type";
 private static final String STATE_BORDER_RADIUS = "state_border_radius";

 @Override
 protected Parcelable onSaveInstanceState()
 {
  Bundle bundle = new Bundle();
  bundle.putParcelable(STATE_INSTANCE, super.onSaveInstanceState());
  bundle.putInt(STATE_TYPE, type);
  bundle.putInt(STATE_BORDER_RADIUS, mBorderRadius);
  return bundle;
 }

 @Override
 protected void onRestoreInstanceState(Parcelable state)
 {
  if (state instanceof Bundle)
  {
   Bundle bundle = (Bundle) state;
   super.onRestoreInstanceState(((Bundle) state)
     .getParcelable(STATE_INSTANCE));
   this.type = bundle.getInt(STATE_TYPE);
   this.mBorderRadius = bundle.getInt(STATE_BORDER_RADIUS);
  } else
  {
   super.onRestoreInstanceState(state);
  }

 }
代码比较简单。我们文章中的demo中,第一个,第四个是可以点击的,点击后会发生变化,你可以点击后,然后旋转屏幕进行测试。
同时我们也对外公布了两个方法,用于动态修改圆角大小和type
public void setBorderRadius(int borderRadius)
 {
  int pxVal = dp2px(borderRadius);
  if (this.mBorderRadius != pxVal)
  {
   this.mBorderRadius = pxVal;
   invalidate();
  }
 }

 public void setType(int type)
 {
  if (this.type != type)
  {
   this.type = type;
   if (this.type != TYPE_ROUND && this.type != TYPE_CIRCLE)
   {
    this.type = TYPE_CIRCLE;
   }
   requestLayout();
  }

 }

 public int dp2px(int dpVal)
 {
  return (int) TypedValue.applyDimension(TypedValue.COMPLEX_UNIT_DIP,
    dpVal, getResources().getDisplayMetrics());
 }
最后贴一下我们的布局文件和MainActivity。
6、调用
布局文件:
<ScrollView xmlns:android="http://schemas.android.com/apk/res/android"
 xmlns:tools="http://schemas.android.com/tools"
 xmlns:zhy="http://schemas.android.com/apk/res/com.zhy.variousshapeimageview"
 android:layout_width="match_parent"
 android:layout_height="wrap_content" >

 <LinearLayout
  android:layout_width="match_parent"
  android:layout_height="match_parent"
  android:orientation="vertical" >

  <com.zhy.view.RoundImageView
   android:id="@+id/id_qiqiu"
   android:layout_width="wrap_content"
   android:layout_height="wrap_content"
   android:layout_margin="10dp"
   android:src="@drawable/qiqiu" >
  </com.zhy.view.RoundImageView>

  <com.zhy.view.RoundImageView
   android:layout_width="200dp"
   android:layout_height="200dp"
   android:layout_margin="10dp"
   android:src="@drawable/aa" >
  </com.zhy.view.RoundImageView>

  <com.zhy.view.RoundImageView
   android:layout_width="wrap_content"
   android:layout_height="wrap_content"
   android:layout_margin="10dp"
   android:src="@drawable/icon" >
  </com.zhy.view.RoundImageView>

  <com.zhy.view.RoundImageView
   android:id="@+id/id_meinv"
   android:layout_width="wrap_content"
   android:layout_height="wrap_content"
   android:layout_margin="10dp"
   android:src="@drawable/aa"
   zhy:borderRadius="20dp"
   zhy:type="round" >
  </com.zhy.view.RoundImageView>

  <com.zhy.view.RoundImageView
   android:layout_width="wrap_content"
   android:layout_height="wrap_content"
   android:layout_margin="10dp"
   android:src="@drawable/icon"
   zhy:borderRadius="40dp"
   zhy:type="round" >
  </com.zhy.view.RoundImageView>

  <com.zhy.view.RoundImageView
   android:layout_width="wrap_content"
   android:layout_height="wrap_content"
   android:layout_margin="10dp"
   android:src="@drawable/qiqiu"
   zhy:borderRadius="60dp"
   zhy:type="round" >
  </com.zhy.view.RoundImageView>
 </LinearLayout>

</ScrollView>
没撒,ScrollView里面一个线性布局,里面一堆RoundImageView。
MainActivity
package com.zhy.variousshapeimageview;

import android.app.Activity;
import android.os.Bundle;
import android.view.View;
import android.view.View.OnClickListener;

import com.zhy.view.RoundImageView;

public class MainActivity extends Activity
{
 private RoundImageView mQiQiu;
 private RoundImageView mMeiNv ;

 @Override
 protected void onCreate(Bundle savedInstanceState)
 {
  super.onCreate(savedInstanceState);
  setContentView(R.layout.activity_main);

  mQiQiu = (RoundImageView) findViewById(R.id.id_qiqiu);
  mMeiNv = (RoundImageView) findViewById(R.id.id_meinv);

  mQiQiu.setOnClickListener(new OnClickListener()
  {
   @Override
   public void onClick(View v)
   {
    mQiQiu.setType(RoundImageView.TYPE_ROUND);
   }
  });

  mMeiNv.setOnClickListener(new OnClickListener()
  {

   @Override
   public void onClick(View v)
   {
    mMeiNv.setBorderRadius(90);
   }
  });
 }

}
最后的效果图:

- Android编程之截屏实现方法(包括scrollview
- Android实现搜索功能并本地保存搜索历史记录
- Android开发的IDE、ADT、SDK、JDK、NDK等名
- Android App调试内存泄露之Cursor篇
- Android客户端软件开发_6、软件的架构、设计
- Android组件ViewStub基本使用方法详解
- 自定义Android六边形进度条(附源码)