- Android仿微信主界面设计
- Android之复选框对话框用法实例分析
- android耳机左右声道接反具体修正方法
- [Android开发从零开始].20.广播事件处理(1)
- android闪关灯的开启和关闭方法代码实例
- Android实现音量调节的方法
- Android基于TextView属性android:ellipsize实现跑马灯效果的方法
- [Android开发从零开始].13.Table.Layout学习
- Android编程实用技术小结
- Android开发笔记之:Dialog的使用详解
- Andorid实现点击获取验证码倒计时效果
- Android程序开发之ListView实现横向滚动(带表头与固定列)
- 在Android线程池里运行代码任务实例
- Android基础之Activity生命周期
- Android编程开发之Spinner控件用法实例分析
- Android中检查、监听电量和充电状态的方法
- Android 关机弹出选择菜单的深入解析
- 解析android中include标签的使用
- [Java4Android]01_Java考古学
- Android编程之利用服务实现电话监听的方法
- android开发教程之卸载sd卡对MediaServer的处理
- Android中的脑残设计总结
- Android需要提升权限的操作方法
- android 布局属性详解
- Android使用MobSDK短信验证
- 详解Java编程中的反射在Android开发中的应用
- android编程实现图片库的封装方法
- Android 编程下字库的使用及注意事项
- Android 不同Activity间数据的传递 Bundle对象的应用
- Android高仿微信聊天界面代码分享
Android基于Sensor感应器获取重力感应加速度的方法
本文实例讲述了Android基于Sensor感应器获取重力感应加速度的方法。分享给大家供大家参考,具体如下:
FETC项目指导老师提出了新的需求,想要在游戏地图中表现出用户用户当期移动的方向,再用GPS的话显然很不靠谱,所以想到了android强大的感应器。。。
很多移动设备都内置了感应器,android通过Sensor和SensorManager类抽象了这些感应器,通过这些类可以使用android设备的传感器
一 介绍Sensor类
SDK只有一句介绍“Class representing a sensor. Use getSensorList(int) to get the list of available Sensors.”,表示一个感应器的类,可以使用getSensorList方法(此方法属于接下来要讲的SensorManager)获得所有可用的感应器,该方法返回的是一个List<Sensor>
下面的列表显示了,Sensor所提供的所有服务
Constants
int TYPE_ACCELEROMETER A constant describing an accelerometer sensor type.
//三轴加速度感应器 返回三个坐标轴的加速度 单位m/s2
int TYPE_ALL A constant describing all sensor types.
//用于列出所有感应器
int TYPE_GRAVITY A constant describing a gravity sensor type.
//重力感应器
int TYPE_GYROSCOPE A constant describing a gyroscope sensor type
//陀螺仪 可判断方向 返回三个坐标轴上的角度
int TYPE_LIGHT A constant describing an light sensor type.
//光线感应器 单位 lux 勒克斯
int TYPE_LINEAR_ACCELERATION A constant describing a linear acceleration sensor type.
//线性加速度
int TYPE_MAGNETIC_FIELD A constant describing a magnetic field sensor type.
//磁场感应 返回三个坐标轴的数值 微特斯拉
int TYPE_ORIENTATION This constant is deprecated. use SensorManager.getOrientation() instead.
//方向感应器 已过时 可以使用方法获得
int TYPE_PRESSURE A constant describing a pressure sensor type
//压力感应器 单位 千帕斯卡
int TYPE_PROXIMITY A constant describing an proximity sensor type.
//距离传感器
int TYPE_ROTATION_VECTOR A constant describing a rotation vector sensor type.
//翻转传感器
int TYPE_TEMPERATURE A constant describing a temperature sensor type
//温度传感器 单位 摄氏度
此类中包含的方法都是get型的 用来获取所选sensor的一些属性,sensor类一般不需要new而是通过SensorManager的方法获得
二 介绍SensorManager类
SDK解释:“SensorManager lets you access the device's sensors. Get an instance of this class by calling Context.getSystemService() with the argument SENSOR_SERVICE.
Always make sure to disable sensors you don't need, especially when your activity is paused. Failing to do so can drain the battery in just a few hours. Note that the system will not disable sensors automatically when the screen turns off. ”
SensorManager 允许你访问设备的感应器。通过传入参数SENSOR_SERVICE参数调用Context.getSystemService方法可以获得一个sensor的实例。永远记得确保当你不需要的时候,特别是Activity暂定的时候,要关闭感应器。忽略这一点肯能导致几个小时就耗尽电池,注意当屏幕关闭时,系统不会自动关闭感应器。
三 常用的感应器
(1) 加速度感应器
可以通过这个感应器获得三个浮点型
x-axis
y-axis
z-axis
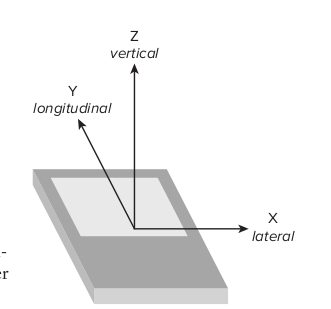
可参阅《android 高级编程2》中的一个插图分析次数据

X Y Z分别对应values[0]到[2]
X表示左右移动的加速度
Y表示前后移动的加速度
Z表示垂直方向的加速度 (测试时发现,将手机置于水平桌面稳定后 XY均为0 Z的值为9.4 约等于重力加速度,依次可以做一个简单的算法实现重力测力计,有时间会给大家一个例子)
下面先看一个基本的获取加速的demo,希望大家好好注意代码中的注释
/*
 * @author octobershiner
 * 2011 07 27
 * SE.HIT
 * 一个演示android加速度感应器的例子
 * */
package uni.sensor;
import java.util.Iterator;
import java.util.List;
import android.app.Activity;
import android.content.Context;
import android.hardware.Sensor;
import android.hardware.SensorEvent;
import android.hardware.SensorEventListener;
import android.hardware.SensorManager;
import android.os.Bundle;
import android.util.Log;
public class SensorDemoActivity extends Activity {
  /** Called when the activity is first created. */
  //设置LOG标签
  private static final String TAG = "sensor";
  private SensorManager sm;
  @Override
  public void onCreate(Bundle savedInstanceState) {
    super.onCreate(savedInstanceState);
    setContentView(R.layout.main);
    //创建一个SensorManager来获取系统的传感器服务
    sm = (SensorManager)getSystemService(Context.SENSOR_SERVICE);
    //选取加速度感应器
    int sensorType = Sensor.TYPE_ACCELEROMETER;
    /*
     * 最常用的一个方法 注册事件
     * 参数1 :SensorEventListener监听器
     * 参数2 :Sensor 一个服务可能有多个Sensor实现,此处调用getDefaultSensor获取默认的Sensor
     * 参数3 :模式 可选数据变化的刷新频率
     * */
    sm.registerListener(myAccelerometerListener,sm.getDefaultSensor(sensorType),SensorManager.SENSOR_DELAY_NORMAL);
  }
  /*
   * SensorEventListener接口的实现,需要实现两个方法
   * 方法1 onSensorChanged 当数据变化的时候被触发调用
   * 方法2 onAccuracyChanged 当获得数据的精度发生变化的时候被调用,比如突然无法获得数据时
   * */
  final SensorEventListener myAccelerometerListener = new SensorEventListener(){
    //复写onSensorChanged方法
    public void onSensorChanged(SensorEvent sensorEvent){
      if(sensorEvent.sensor.getType() == Sensor.TYPE_ACCELEROMETER){
        Log.i(TAG,"onSensorChanged");
        //图解中已经解释三个值的含义
        float X_lateral = sensorEvent.values[0];
        float Y_longitudinal = sensorEvent.values[1];
        float Z_vertical = sensorEvent.values[2];
        Log.i(TAG,"\n heading "+X_lateral);
        Log.i(TAG,"\n pitch "+Y_longitudinal);
        Log.i(TAG,"\n roll "+Z_vertical);
      }
    }
    //复写onAccuracyChanged方法
    public void onAccuracyChanged(Sensor sensor , int accuracy){
      Log.i(TAG, "onAccuracyChanged");
    }
  };
  public void onPause(){
    /*
     * 很关键的部分:注意,说明文档中提到,即使activity不可见的时候,感应器依然会继续的工作,测试的时候可以发现,没有正常的刷新频率
     * 也会非常高,所以一定要在onPause方法中关闭触发器,否则讲耗费用户大量电量,很不负责。
     * */
    sm.unregisterListener(myAccelerometerListener);
    super.onPause();
  }
}
测试的时候会发现刷新的特别快,这就引出一个问题,如果真的要呈现在UI中的话,就会不断的绘制界面,非常耗费资源,所以《android高级编程》中给出了一个方案就是引入新的线程来刷新界面,明天有时间的话,尽量把把例子给大家。
希望本文所述对大家Android程序设计有所帮助。
- [Android开发视频教学]01_24_Socket编程
- Android Content Provider详解及示例代码
- Android入门之画图详解
- Android编程中Handler原理及用法实例分析
- Android开发之针对联系人的封装
- Android Socket服务端与客户端用字符串的方
- Android获取屏幕或View宽度和高度的方法