- Android应用开发中Fragment间通信的实现教程
- 直接应用项目中的Android图片缓存技术
- 浅谈Android app开发中Fragment的Transaction操作
- Mac中Eclipse连不上Android手机的解决方法
- Android使用criteria选择合适的地理位置服务实现方法
- Android 中 Fragment的使用大全
- Android入门之使用eclipse进行源码开发的方法
- Android设置TextView首行缩进示例代码
- 玩转Android之Drawable的使用
- android自定义控件创建翻页接口详细代码
- Android编程之文件的读写实例详解
- android动态布局之动态加入TextView和ListView的方法
- Android下拉刷新官方版
- Android观察者模式实例分析
- [Java4Android]16_this的使用方法
- Android 更新UI的方法汇总
- 详解Android中一些SQLite的增删改查操作
- 分享实现Android图片选择的两种方式
- Android编程实现小说阅读器滑动效果的方法
- 详解Java编程中的反射在Android开发中的应用
- 实例详解Android快速开发工具类总结
- Android通过Handler与AsyncTask两种方式动态更新ListView(附源码)
- Android开发自学笔记(三):APP布局上
- Android使用WebView播放flash的方法
- 实例详解Android 获取短信会话列表
- 解析:android 如何从JPEG生成BufferedImage
- Android开发学习之WallPaper设置壁纸详细介绍与实例
- Android开发之activiti节点跳转
- Android下拉列表(Spinner)效果(使用C#和Java分别实现)
- android在root模式下接听来电的方法
Android中创建一个透明的进度对话框实例
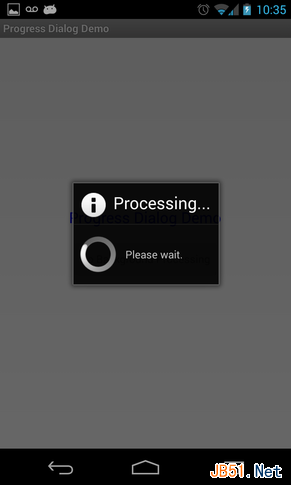
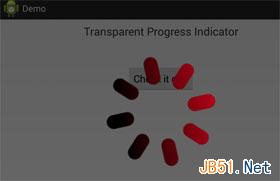
首先我们看一下什么叫做透明的进度对话框:

接下来我们讲一下如何创建:
1、使用Eclipse创建一个新的Android 项目,使用Android 2.2或以上。
2、在/res/layout文件夹,创建线性布局activity_main.xml文件,主要是为了添加一个文本标签和一个按钮
复制代码 代码如下:
activity_main.xml
<LinearLayout xmlns:android="http://schemas.android.com/apk/res/android"
android:layout_width="match_parent"
android:layout_height="match_parent"
android:orientation="vertical">
<TextView
android:layout_width="match_parent"
android:layout_height="wrap_content"
android:gravity="center_horizontal"
android:padding="8dp"
android:textSize="20sp"
android:text="Transparent Progress Indicator" />
<Button
android:layout_width="wrap_content"
android:layout_height="wrap_content"
android:text="Check it out!"
android:layout_marginTop="40dp"
android:layout_gravity="center"
android:id="@+id/the_button" />
</LinearLayout>
3、在/res/values中打开styles.xml,在这里将添加透明对话框的样式。请务必指定父属性,否则你在运行时会出现问题
复制代码 代码如下:
styles.xml
<resources>
<!--
Base application theme, dependent on API level. This theme is replaced
by AppBaseTheme from res/values-vXX/styles.xml on newer devices.
-->
<style name="AppBaseTheme" parent="android:Theme.Light">
<!--
Theme customizations available in newer API levels can go in
res/values-vXX/styles.xml, while customizations related to
backward-compatibility can go here.
-->
</style>
<!-- Application theme. -->
<style name="AppTheme" parent="AppBaseTheme">
<!-- All customizations that are NOT specific to a particular API-level can go here. -->
</style>
<!-- Transparent dialog -->
<style name="TransparentProgressDialog" parent="@android:Theme.Dialog">
<item name="android:windowFrame">@null</item>
<item name="android:windowBackground">@android:color/transparent</item>
<item name="android:windowIsFloating">true</item>
<item name="android:windowContentOverlay">@null</item>
<item name="android:windowTitleStyle">@null</item>
<item name="android:windowAnimationStyle">@android:style/Animation.Dialog</item>
<item name="android:windowSoftInputMode">stateUnspecified|adjustPan</item>
<item name="android:backgroundDimEnabled">true</item>
<item name="android:background">@android:color/transparent</item>
</style>
</resources>
4、 在/res中间添加一个动态旋转的动画图片:

5、现在可以实现您的MainActivity.java文件了
复制代码 代码如下:
MainActivity.java
package com.authorwjf.transparentprogressdialog;
import android.os.Bundle;
import android.os.Handler;
import android.app.Activity;
import android.app.Dialog;
import android.content.Context;
import android.view.Gravity;
import android.view.View;
import android.view.View.OnClickListener;
import android.view.ViewGroup.LayoutParams;
import android.view.WindowManager;
import android.view.animation.Animation;
import android.view.animation.LinearInterpolator;
import android.view.animation.RotateAnimation;
import android.widget.ImageView;
import android.widget.LinearLayout;
public class MainActivity extends Activity implements OnClickListener {
private TransparentProgressDialog pd;
private Handler h;
private Runnable r;
@Override
protected void onCreate(Bundle savedInstanceState) {
super.onCreate(savedInstanceState);
setContentView(R.layout.activity_main);
h = new Handler();
pd = new TransparentProgressDialog(this, R.drawable.spinner);
r =new Runnable() {
@Override
public void run() {
if (pd.isShowing()) {
pd.dismiss();
}
}
};
findViewById(R.id.the_button).setOnClickListener(this);
}
@Override
public void onClick(View v) {
pd.show();
h.postDelayed(r,5000);
}
@Override
protected void onDestroy() {
h.removeCallbacks(r);
if (pd.isShowing() ) {
pd.dismiss();
}
super.onDestroy();
}
}
6、以下是实现透明动画的代码
复制代码 代码如下:
private class TransparentProgressDialog extends Dialog {
private ImageView iv;
public TransparentProgressDialog(Context context, int resourceIdOfImage) {
super(context, R.style.TransparentProgressDialog);
WindowManager.LayoutParams wlmp = getWindow().getAttributes();
wlmp.gravity = Gravity.CENTER_HORIZONTAL;
getWindow().setAttributes(wlmp);
setTitle(null);
setCancelable(false);
setOnCancelListener(null);
LinearLayout layout = new LinearLayout(context);
layout.setOrientation(LinearLayout.VERTICAL);
LinearLayout.LayoutParams params = new LinearLayout.LayoutParams(LayoutParams.MATCH_PARENT, LayoutParams.WRAP_CONTENT);
iv = new ImageView(context);
iv.setImageResource(resourceIdOfImage);
layout.addView(iv, params);
addContentView(layout, params);
}
@Override
public void show() {
super.show();
RotateAnimation anim = new RotateAnimation(0.0f, 360.0f , Animation.RELATIVE_TO_SELF, .5f, Animation.RELATIVE_TO_SELF, .5f);
anim.setInterpolator(new LinearInterpolator());
anim.setRepeatCount(Animation.INFINITE);
anim.setDuration(3000);
iv.setAnimation(anim);
iv.startAnimation(anim);
}
}
最后的结果是

- 上一篇文章: android开发教程之实现toast工具类
- 下一篇文章: android输入框与文本框加滚动条scrollview示例
- Android网络连接判断与相关处理
- Android系统设置中的清除数据会清除哪些数据
- android新建草稿删除后下次开机还会显示保存
- Android学习笔记——Menu介绍(三)
- Android系统开发中log的使用方法及简单的原
- Android应用中使用XmlSerializer序列化XML数
- Android 显示和隐藏软键盘的方法(手动)