- Android App开发中Gradle构建过程的配置方法
- android开发教程之卸载sd卡对MediaServer的处理
- Android开发中PopupWindow用法实例分析
- Android编程之Application设置全局变量及传值用法实例分析
- Qt for Android开发实例教程
- Android实现从相册截图的功能
- android 判断横竖屏问题的详解
- Java4Android开发教程(二)hello world!
- Android设置桌面背景图片的实现方法
- android LinearLayout 布局实例代码
- Android后台线程和UI线程通讯实例
- wenserver获取天气预报数据实例分享
- Android崩溃异常捕获方法
- Android应用开发中数据的保存方式总结
- Android使用ViewDragHelper实现仿QQ6.0侧滑界面(一)
- Android定时器和Handler用法实例分析
- Android复选框对话框用法实例简析
- Android程序开发之获取汉字的首字母
- Android编程之Animation动画详解
- Android中利用App实现消息推送机制的代码
- android ListView和ProgressBar(进度条控件)的使用方法
- Android编程实现动态更新ListView的方法
- Android图片加载的缓存类
- Android编程实现图标拖动效果的方法
- Android系统检测程序内存占用各种方法
- Android中的广播和广播接收器代码实例
- C#中利用正则表达式将人民币金额转换为大写汉字
- Android高级开发之性能优化典范
- android的activity跳转到另一个activity
- Android客户端软件开发_2、Android娱乐多媒体的开发的重要的战略意义分析
android调用web service(cxf)实例应用详解
1.下载该夹包可以直接登录http://code.google.com/p/ksoap2-android/,现在该站点已经提供了直接的下载,只要点击下载链接就可以下载了;
我现在的是ksoap2-android-assembly-2.6.5-jar-with-dependencies.jar
2.好了,现在我们就可以进行新建项目来进行测试了,首先我们先建立java服务端,这里的一些前期准备我就不说了(比如与spring的整合等示例),
由于这里重点是android客户端,java服务器端就直接给代码了
Interface:(这里提供了两个方法,一个传递的是简单字符串,另一个传递的是符合对象+集合)
复制代码 代码如下:
package xidian.sl.service.webService;
import javax.jws.WebParam;
import javax.jws.WebService;
import javax.jws.soap.SOAPBinding;
import javax.jws.soap.SOAPBinding.Style;
import xidian.sl.service.impl.webService.StudentList;
@WebService
@SOAPBinding(style = Style.RPC)
public interface TestService {
public String getUser(@WebParam(name = "name")String name);
public StudentList getStuList();
}
implement:
复制代码 代码如下:
package xidian.sl.service.impl.webService;
import java.util.ArrayList;
import java.util.List;
import javax.jws.WebService;
import xidian.sl.entity.Students;
import xidian.sl.service.webService.TestService;
@WebService(endpointInterface = "xidian.sl.service.webService.TestService")
public class TestServiceImpl implements TestService {
@Override
public String getUser(String name) {
System.out.println("客户端传递的名字为 = "+name);
return name;
}
@Override
public StudentList getStuList() {
System.out.println("该方法被调用");
List<Students> stuList = new ArrayList<Students>();
//第一个学生
Students stu1 = new Students();
stu1.setStuName("沈浪");
stu1.setStuNum("1006010054");
stu1.setStuSex("男");
stuList.add(stu1);
//第二个学生
Students stu2 = new Students();
stu2.setStuName("香香");
stu2.setStuNum("1006010043");
stu2.setStuSex("女");
stuList.add(stu2);
//将List集合封装成一个对象才能在webService中进行传递
StudentList studentList = new StudentList();
studentList.setStuList(stuList);
return studentList;
}
}
list的封装对象
复制代码 代码如下:
package xidian.sl.service.impl.webService;
import java.util.List;
import xidian.sl.entity.Students;
public class StudentList {
private List<Students> stuList;
public List<Students> getStuList() {
return stuList;
}
public void setStuList(List<Students> stuList) {
this.stuList = stuList;
}
}
然后在srping的整合配置文件中进行如下配置即可(默认web.xml中已经进行配置)
复制代码 代码如下:
<?xml version="1.0" encoding="UTF-8"?>
<beans xmlns="http://www.springframework.org/schema/beans"
xmlns:xsi="http://www.w3.org/2001/XMLSchema-instance"
xmlns:jaxws="http://cxf.apache.org/jaxws"
xsi:schemaLocation="
http://www.springframework.org/schema/beans
http://www.springframework.org/schema/beans/spring-beans.xsd
http://www.springframework.org/schema/context
http://www.springframework.org/schema/context/spring-context.xsd
http://cxf.apache.org/jaxws
http://cxf.apache.org/schemas/jaxws.xsd">
<import resource="classpath:META-INF/cxf/cxf.xml" /> <!-- 这些xml文件在cxf-2.5.0.jar的META-INF目录下-->
<!--<import resource="classpath:META-INF/cxf/cxf-extension-soap.xml" />
警告提示已经废弃了cxf-extension-soap.xml文件-->
<import resource="classpath:META-INF/cxf/cxf-servlet.xml" />
<!-- 这里配置服务接口,后面描述
id:指在spring配置的bean的ID.
Implementor:指明具体的实现类.
Address:指明这个web service的相对地址
-->
<!-- 测试 -->
<bean id="testServiceImpl" class="xidian.sl.service.impl.webService.TestServiceImpl" >
</bean>
<jaxws:endpoint id="testService"
implementor="#testServiceImpl"
address="/test" />
<!-- 开启tomcat服务器 ,访问http://localhost:8080/WebExam/services/test?wsdl
http://localhost:8080/WebExam是本项目的访问地址
services是由于web.xml配置所得,test是由于Spring配置文件中的address属性所得
-->
</beans>
3.到此服务器端的已经建立完全,我们可以测试下:开启tomcat,然后在浏览器中输入http://localhost:8090/WebExam/services/test?wsdl可以查看wsdl

现在我们就可以开始建立android客户端了
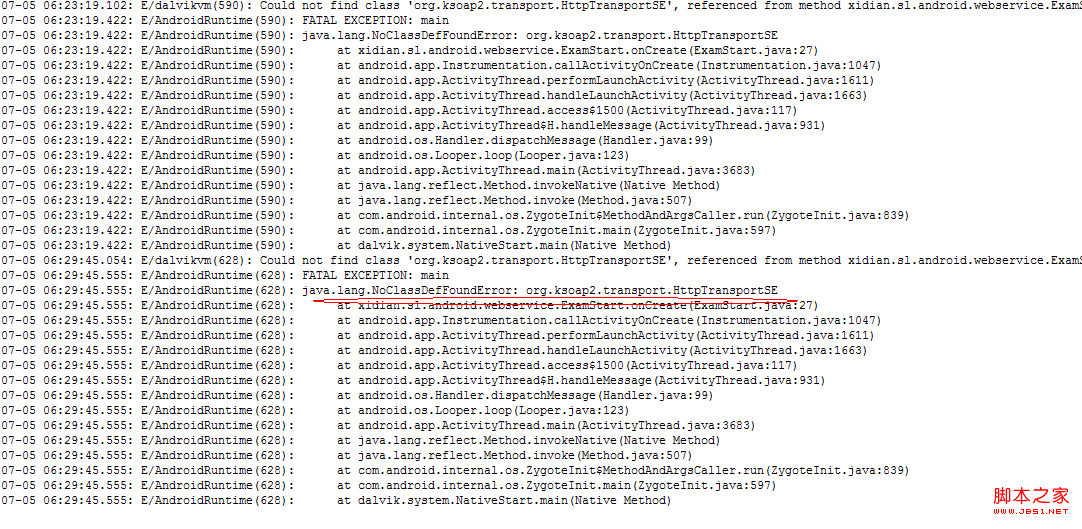
新建一个项目后导入ksoap2-android-assembly-2.6.5-jar-with-dependencies.jar,这里要特别注意:导入包的方式不要选择项目右键---->build path---->
add external archives...,如果使用这种方式表面上好像是导入了包,但还是没有办法引用到,然后启动项目后一直会报:

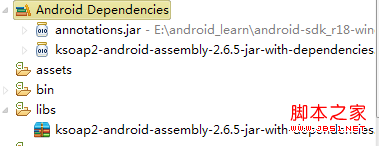
我们还是选择和开发web一样的方式,就是在项目下新建lib或者libs文件夹,然后将jar直接复制到该文件夹中,IDE会帮助直接引入的:

这样就正确无误了,不再会报类无法引用到了
android中通过webservice调用服务器端其实还是很简单的,只要按部就班的按照下面步骤进行即可:
(1)创建HttpTransportSE对象,该对象用于调用WebService操作
复制代码 代码如下:
HttpTransportSE ht = new HttpTransportSE(SERVICE_URL);
(2)创建SoapSerializationEnvelope对象
复制代码 代码如下:
SoapSerializationEnvelope envelope = new SoapSerializationEnvelope
(SoapEnvelope.VER11);
(3)创建SoapObject对象,创建该对象时需要传入所要调用的Web Service的命名空间和WebService方法名
复制代码 代码如下:
SoapObject request = new SoapObject(SERVICE_NS, methodName);
(4)如果有参数传给Web Service服务器端,调用SoapObject对象的addProperty(String name, Object value)方法来设置参数,该方法的name参数指定参数名
注意:参数名不一定要与服务端的方法中的参数名相同,只要对应顺序相同即可;value参数指定参数值
复制代码 代码如下:
request.addProperty("name", "1006010054");
(5)调用SoapSerializationEnvelope的setOutputSoapObject()方法,或者直接对bodyOut属性赋值,将前两步创建的SoapObject对象设为SoapSerializationEnvelope的传出SOAP消息体
复制代码 代码如下:
envelope.bodyOut = request;
(6)调用对象的call()方法,并以SoapSerializationEnvelope作为参数调用远程的web service
复制代码 代码如下:
ht.call(null, envelope);
(7)掉用完成后,访问SoapSerializationEnvelope对象的bodyIn属性,该属性返回一个SoapObject对象,该对象就代表Web service的返回消息,解析该对象,即可获得调用web service的返回值
复制代码 代码如下:
SoapObject result = (SoapObject) envelope.bodyIn;
String name = result.getProperty(0).toString();
下面给书具体的实例:
mian.xml很简单就是两个编辑框:
复制代码 代码如下:
<?xml version="1.0" encoding="utf-8"?>
<LinearLayout xmlns:android="http://schemas.android.com/apk/res/android"
android:layout_width="fill_parent"
android:layout_height="fill_parent"
android:orientation="vertical" >
<TextView
android:layout_width="fill_parent"
android:layout_height="wrap_content"
android:text="@string/hello" />
<EditText
android:id="@+id/editText1"
android:layout_width="match_parent"
android:layout_height="wrap_content"
android:ems="10" >
<requestFocus />
</EditText>
<EditText
android:id="@+id/editText2"
android:layout_width="match_parent"
android:layout_height="wrap_content"
android:ems="10" />
</LinearLayout>
Activity:(该Activity调用了服务器端返回普通字符串的方法)
复制代码 代码如下:
package xidian.sl.android.webservice;
import org.ksoap2.SoapEnvelope;
import org.ksoap2.serialization.SoapObject;
import org.ksoap2.serialization.SoapSerializationEnvelope;
import org.ksoap2.transport.HttpTransportSE;
import android.app.Activity;
import android.os.Bundle;
import android.widget.EditText;
public class WebServiceSimpleDemo extends Activity{
final static String SERVICE_NS = "http://webService.service.sl.xidian/";
final static String SERVICE_URL = "http://192.168.1.103:8090/WebExam/services/test";
private EditText txt1;
private EditText txt2;
/** Called when the activity is first created. */
@Override
public void onCreate(Bundle savedInstanceState) {
super.onCreate(savedInstanceState);
setContentView(R.layout.main);
txt1 = (EditText) findViewById(R.id.editText1);
txt2 = (EditText) findViewById(R.id.editText2);
//调用的方法
String methodName = "getUser";
//创建httpTransportSE传输对象
HttpTransportSE ht = new HttpTransportSE(SERVICE_URL);
ht.debug = true;
//使用soap1.1协议创建Envelop对象
SoapSerializationEnvelope envelope = new SoapSerializationEnvelope(SoapEnvelope.VER11);
//实例化SoapObject对象
SoapObject request = new SoapObject(SERVICE_NS, methodName);
/**
* 设置参数,参数名不一定需要跟调用的服务器端的参数名相同,只需要对应的顺序相同即可
* */
request.addProperty("name", "1006010054");
//将SoapObject对象设置为SoapSerializationEnvelope对象的传出SOAP消息
envelope.bodyOut = request;
try{
//调用webService
ht.call(null, envelope);
//txt1.setText("看看"+envelope.getResponse());
if(envelope.getResponse() != null){
txt2.setText("有返回");
SoapObject result = (SoapObject) envelope.bodyIn;
String name = result.getProperty(0).toString();
txt1.setText("返回值 = "+name);
}else{
txt2.setText("无返回");
}
}catch (Exception e) {
e.printStackTrace();
}
}
}
在AndroidManifest.xml进行Activity的注册和并添加访问网络的权限
复制代码 代码如下:
<?xml version="1.0" encoding="utf-8"?>
<manifest xmlns:android="http://schemas.android.com/apk/res/android"
package="xidian.sl.android.webservice"
android:versionCode="1"
android:versionName="1.0" >
<uses-sdk android:minSdkVersion="10" />
<application
android:icon="@drawable/ic_launcher"
android:label="@string/app_name" >
<activity
android:name=".WebServiceSimpleDemo"
android:label="@string/app_name" >
<intent-filter>
<action android:name="android.intent.action.MAIN" />
<category android:name="android.intent.category.LAUNCHER" />
</intent-filter>
</activity>
</application>
<!-- 声明该应用自身所拥有的权限 -->
<uses-permission android:name="android.permission.INTERNET" />
</manifest>
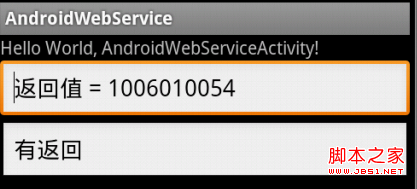
运行后的结果如图所示:

下面我们来试着调用回传符合对象的方法:
activity:
复制代码 代码如下:
package xidian.sl.android.webservice;
import org.ksoap2.SoapEnvelope;
import org.ksoap2.serialization.SoapObject;
import org.ksoap2.serialization.SoapSerializationEnvelope;
import org.ksoap2.transport.HttpTransportSE;
import android.app.Activity;
import android.os.Bundle;
import android.widget.EditText;
public class WebServiceComplexDemo extends Activity{
final static String SERVICE_NS = "http://webService.service.sl.xidian/";
final static String SERVICE_URL = "http://192.168.1.103:8090/WebExam/services/test";
private EditText txt1;
private EditText txt2;
/** Called when the activity is first created. */
@Override
public void onCreate(Bundle savedInstanceState) {
super.onCreate(savedInstanceState);
setContentView(R.layout.main);
txt1 = (EditText) findViewById(R.id.editText1);
txt2 = (EditText) findViewById(R.id.editText2);
//调用的方法
String methodName = "getStuList";
//创建httpTransportSE传输对象
HttpTransportSE ht = new HttpTransportSE(SERVICE_URL);
ht.debug = true;
//使用soap1.1协议创建Envelop对象
SoapSerializationEnvelope envelope = new SoapSerializationEnvelope(SoapEnvelope.VER11);
//实例化SoapObject对象
SoapObject request = new SoapObject(SERVICE_NS, methodName);
/**
* 设置参数,参数名不一定需要跟调用的服务器端的参数名相同,只需要对应的顺序相同即可
* */
//request.addProperty("name", "1006010054");
//将SoapObject对象设置为SoapSerializationEnvelope对象的传出SOAP消息
envelope.bodyOut = request;
try{
//调用webService
ht.call(null, envelope);
txt2.setText("回传的值 :"+envelope.getResponse());
if(envelope.getResponse() != null){
SoapObject result = (SoapObject) envelope.bodyIn;
SoapObject soapChilds = (SoapObject)result.getProperty(0);
StringBuffer sb = new StringBuffer();
for(int i=0; i <soapChilds.getPropertyCount(); i++){
SoapObject soapChildsChilds = (SoapObject)soapChilds.getProperty(i);
sb.append("姓名["+i+"] = "+soapChildsChilds.getProperty(0).toString()+"\n");
sb.append("学号["+i+"] = "+soapChildsChilds.getProperty(1).toString()+"\n");
sb.append("性别["+i+"] = "+soapChildsChilds.getProperty(2).toString()+"\n"+"\n");
}
txt1.setText(sb.toString());
}else{
txt1.setText("无返回");
}
}catch (Exception e) {
e.printStackTrace();
}
}
}
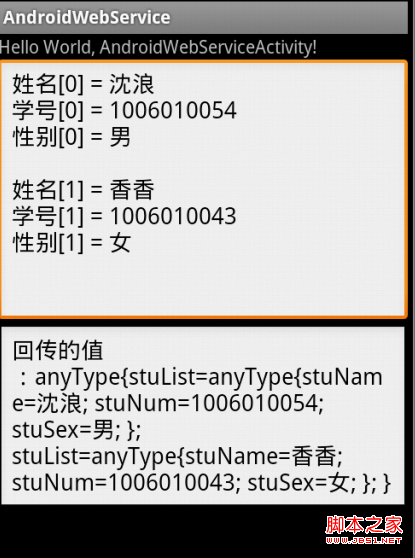
区别就是对于返回值的处理上,使用几次getPropert()方法,这里主要看返回值的层次,看下面的结果应该就能明白了,根据括号的层次来进行确定

- 上一篇文章: Android开发之串口编程原理和实现方式
- 下一篇文章: Android检测Cursor泄漏的原理以及使用方法
- Android获取当前手机网络类型(2g、3g、4g、
- 安卓监听屏幕的横竖翻转实现方法
- 简单好用的PHP分页类
- android界面布局之实现文本块布局效果示例
- Android开发新手必须知道的10大严重错误
- Android提高之BroadcastReceiver实例详解
- Android开发者需要知道的8个项目管理技巧