- Android从系统Gallery获取图片具体实现
- 详解Android中Drawable方法
- Android App中使用ListFragment的实例教程
- android 检查网络连接状态实现步骤
- Android动态添加menu菜单的简单方法
- Android搜索框组件SearchView的基本使用方法
- Android自定义View仿QQ等级天数进度
- Android中通过Notification&NotificationManager实现消息通知
- Andorid自定义attr的各种坑
- Android 异步加载图片的实例代码
- android开发之方形圆角listview代码分享
- Android编程实现微信分享信息的方法
- android编程实现为程序创建快捷方式的方法
- 基于Android中手势交互的实现方法
- ListView实现下拉刷新加载更多的实例代码(直接拿来用)
- 简介Android应用中sharedPreferences类存储数据的用法
- [Android开发视频教学]01_05_Activity和Intent
- 基于Android的英文词典的实现方法
- Android文本框搜索和清空效果实现代码及简要概述
- android 获取屏幕尺寸
- android实现背景平铺的三种方法
- android开发教程之framework增加字符串资源和图片等resource资源
- Android GestureDetector手势滑动使用实例讲解
- Android重写View并自定义属性实例分析
- Android编程开发音乐播放器实例
- android错误 aapt.exe已停止工作的解决方法
- Android编程中activity启动时出现白屏、黑屏问题的解决方法
- Android中自定义Checkbox组件实例
- Android设置TextView显示指定个数字符,超过部分显示...(省略号)的方法
- Android获取手机系统版本等信息的方法
android Watchdog 实现剖析
作者:佚名 Android开发编辑:admin 更新时间:2022-07-23
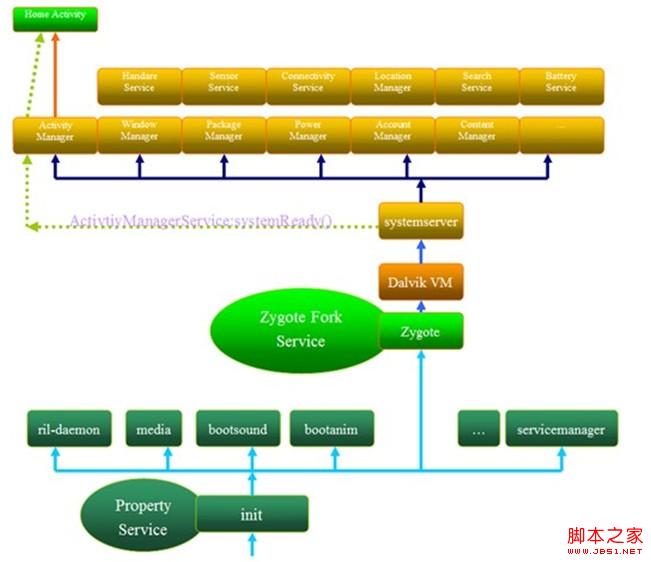
系统启动过程图:

Framework层所有的Service都是运行在SystemServer进程中;SystemServer进程是由Zygote进程创建。
SystemServer进程启动分两个过程init1创建Service和进程状态对象;init2创建Framework层的Service,将其加入到ServiceManager中,最后启动launcher;
Android提供了Watchdog类,用来监测Service是否处于正常工作中,是在SystemServer中启动的。
下面看一下SystemServer中Watchdog这个过程。
SystemServer.java:
复制代码 代码如下:
public void run() {
//初始化Watchdog 传入各个Service作为参数
Watchdog.getInstance().init(context, battery, power, alarm,
ActivityManagerService.self());
//启动Watchdog
Watchdog.getInstance().start();
}
Watchdog类实现
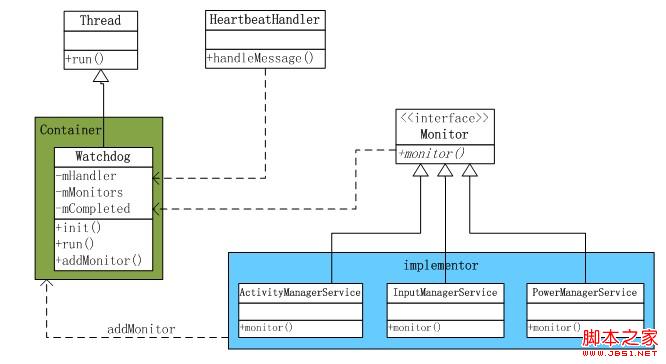
类继承结构:

看到Watchdog是一个Thread,运行在SystemServer进程中,单例模式;
HeartbeatHandler处理接受监控的对象(Service),运行在主线程中;
Monitor提供监控接口,接受监控对象实现此接口;
XXXService具体实现的检测对象。
执行流程:

对外接口
初始化:
复制代码 代码如下:
public void init(Context context, BatteryService battery,
PowerManagerService power, AlarmManagerService alarm,
ActivityManagerService activity) {
//存储Service对象,运行在同一个进程中
mResolver = context.getContentResolver();
mBattery = battery; mPower = power;
mAlarm = alarm; mActivity = activity;
//注册广播
context.registerReceiver(new RebootReceiver(),
new IntentFilter(REBOOT_ACTION));
mRebootIntent = PendingIntent.getBroadcast(context,
, new Intent(REBOOT_ACTION), 0);
……
//开机时间
mBootTime = System.currentTimeMillis();
}
注册监控对象:
复制代码 代码如下:
public void addMonitor(Monitor monitor) {
synchronized (this) {
//将监控对象加入到列表中
mMonitors.add(monitor);
}
}
搜索一下此函数的调用,表示被监控;看到在如下Service中实现Watchdog的Monitor接口:
ActivityManagerService
InputManagerService
NetworkManagementService
PowerManagerService
WindowManagerService
都有调用:Watchdog.getInstance().addMonitor(this);
Watchdog线程执行函数:
复制代码 代码如下:
public void run() {
boolean waitedHalf = false;
while (true) {
//监测完成标志
mCompleted = false;
//发送监测消息
mHandler.sendEmptyMessage(MONITOR);
synchronized (this) {
long timeout = TIME_TO_WAIT;
long start = SystemClock.uptimeMillis();
while (timeout > 0 && !mForceKillSystem) {
//休眠等待检查结果
wait(timeout); // notifyAll() is called when mForceKillSystem is set
timeout = TIME_TO_WAIT - (SystemClock.uptimeMillis() - start);
}
if (mCompleted && !mForceKillSystem) {
//检查结果OK
waitedHalf = false;
continue;
}
//在进行检查一次
if (!waitedHalf) {
ActivityManagerService.dumpStackTraces(true, pids, null, null,
NATIVE_STACKS_OF_INTEREST);
waitedHalf = true;
continue;
}
}
//表明监控对象有问题
// If we got here, that means that the system is most likely hung.
// First collect stack traces from all threads of the system process.
// Then kill this process so that the system will restart.
//保存stack信息
……
// Only kill the process if the debugger is not attached.
if(!Debug.isDebuggerConnected()) {
if(SystemProperties.getInt("sys.watchdog.disabled", 0) == 0) {
//kill当前进程SystemServer
Process.killProcess(Process.myPid());
System.exit(10);
}
}
waitedHalf = false;
}
}
在此run函数中循环发送消息,判断标志是否正常,决定检测对象是否正常工作。
若监测对象不正常工作,则收集重要的stack信息保存下来,然后重启SystemServer。
监测消息的处理:
是在HeartbeatHandler中进行,看看消息处理函数。
复制代码 代码如下:
public void handleMessage(Message msg) {
switch (msg.what) {
case MONITOR: {
// See if we should force a reboot.
//监测对象是否正常工作中……
final int size = mMonitors.size();
for (int i = 0 ; i < size ; i++) {
//调用监测对象的monitor接口
mCurrentMonitor = mMonitors.get(i);
mCurrentMonitor.monitor();
}
//走到这里表明监测对象正常
synchronized (Watchdog.this) {
mCompleted = true;
mCurrentMonitor = null;
}
} break;
}
}
判断监测对象是否正常工作,通过调用监测对象实现的接口monitor,看看这个接口该如何执行的。
PowerManagerService中:
public void monitor() {
//判断Service是否发生死锁,如果发生死锁,程序将在此一直等待//主要是线程间同步问题 造成死锁
synchronized (mLocks) { }
}
以上便是Watchdog监测Service是否正常工作的流程;我们也可以使用Watchdog来监测别的资源如内存等使用情况。
这个Watchdog给我们提供了一种思路,一种框架,对程序正常运行或者资源的正常使用情况等的一种监测机制。

Framework层所有的Service都是运行在SystemServer进程中;SystemServer进程是由Zygote进程创建。
SystemServer进程启动分两个过程init1创建Service和进程状态对象;init2创建Framework层的Service,将其加入到ServiceManager中,最后启动launcher;
Android提供了Watchdog类,用来监测Service是否处于正常工作中,是在SystemServer中启动的。
下面看一下SystemServer中Watchdog这个过程。
SystemServer.java:
复制代码 代码如下:
public void run() {
//初始化Watchdog 传入各个Service作为参数
Watchdog.getInstance().init(context, battery, power, alarm,
ActivityManagerService.self());
//启动Watchdog
Watchdog.getInstance().start();
}
Watchdog类实现
类继承结构:

看到Watchdog是一个Thread,运行在SystemServer进程中,单例模式;
HeartbeatHandler处理接受监控的对象(Service),运行在主线程中;
Monitor提供监控接口,接受监控对象实现此接口;
XXXService具体实现的检测对象。
执行流程:

对外接口
初始化:
复制代码 代码如下:
public void init(Context context, BatteryService battery,
PowerManagerService power, AlarmManagerService alarm,
ActivityManagerService activity) {
//存储Service对象,运行在同一个进程中
mResolver = context.getContentResolver();
mBattery = battery; mPower = power;
mAlarm = alarm; mActivity = activity;
//注册广播
context.registerReceiver(new RebootReceiver(),
new IntentFilter(REBOOT_ACTION));
mRebootIntent = PendingIntent.getBroadcast(context,
, new Intent(REBOOT_ACTION), 0);
……
//开机时间
mBootTime = System.currentTimeMillis();
}
注册监控对象:
复制代码 代码如下:
public void addMonitor(Monitor monitor) {
synchronized (this) {
//将监控对象加入到列表中
mMonitors.add(monitor);
}
}
搜索一下此函数的调用,表示被监控;看到在如下Service中实现Watchdog的Monitor接口:
ActivityManagerService
InputManagerService
NetworkManagementService
PowerManagerService
WindowManagerService
都有调用:Watchdog.getInstance().addMonitor(this);
Watchdog线程执行函数:
复制代码 代码如下:
public void run() {
boolean waitedHalf = false;
while (true) {
//监测完成标志
mCompleted = false;
//发送监测消息
mHandler.sendEmptyMessage(MONITOR);
synchronized (this) {
long timeout = TIME_TO_WAIT;
long start = SystemClock.uptimeMillis();
while (timeout > 0 && !mForceKillSystem) {
//休眠等待检查结果
wait(timeout); // notifyAll() is called when mForceKillSystem is set
timeout = TIME_TO_WAIT - (SystemClock.uptimeMillis() - start);
}
if (mCompleted && !mForceKillSystem) {
//检查结果OK
waitedHalf = false;
continue;
}
//在进行检查一次
if (!waitedHalf) {
ActivityManagerService.dumpStackTraces(true, pids, null, null,
NATIVE_STACKS_OF_INTEREST);
waitedHalf = true;
continue;
}
}
//表明监控对象有问题
// If we got here, that means that the system is most likely hung.
// First collect stack traces from all threads of the system process.
// Then kill this process so that the system will restart.
//保存stack信息
……
// Only kill the process if the debugger is not attached.
if(!Debug.isDebuggerConnected()) {
if(SystemProperties.getInt("sys.watchdog.disabled", 0) == 0) {
//kill当前进程SystemServer
Process.killProcess(Process.myPid());
System.exit(10);
}
}
waitedHalf = false;
}
}
在此run函数中循环发送消息,判断标志是否正常,决定检测对象是否正常工作。
若监测对象不正常工作,则收集重要的stack信息保存下来,然后重启SystemServer。
监测消息的处理:
是在HeartbeatHandler中进行,看看消息处理函数。
复制代码 代码如下:
public void handleMessage(Message msg) {
switch (msg.what) {
case MONITOR: {
// See if we should force a reboot.
//监测对象是否正常工作中……
final int size = mMonitors.size();
for (int i = 0 ; i < size ; i++) {
//调用监测对象的monitor接口
mCurrentMonitor = mMonitors.get(i);
mCurrentMonitor.monitor();
}
//走到这里表明监测对象正常
synchronized (Watchdog.this) {
mCompleted = true;
mCurrentMonitor = null;
}
} break;
}
}
判断监测对象是否正常工作,通过调用监测对象实现的接口monitor,看看这个接口该如何执行的。
PowerManagerService中:
public void monitor() {
//判断Service是否发生死锁,如果发生死锁,程序将在此一直等待//主要是线程间同步问题 造成死锁
synchronized (mLocks) { }
}
以上便是Watchdog监测Service是否正常工作的流程;我们也可以使用Watchdog来监测别的资源如内存等使用情况。
这个Watchdog给我们提供了一种思路,一种框架,对程序正常运行或者资源的正常使用情况等的一种监测机制。
- Android依据名字通过反射获取在drawable中的
- 简单介绍Android开发中的Activity控件的基本
- Android App开发中将View或Drawable转为Bit
- android中图形图像处理之drawable用法分析
- 实例讲解Android中的AIDL内部进程通信接口使
- Android-如何将RGB彩色图转换为灰度图方法介
- Android仿微信滑动弹出编辑、删除菜单效果、