- MacOSX常用快捷键
- 多视图控制器跳转方法
- 一周随笔--15.9.28
- ios团购分类页面(9宫格)
- iOS程序开发中设置UITableView的全屏分隔线的方法(不画线)
- 整合TabBarController与NavigationController
- base64加密解密文件
- IOS图像拉伸解决方案
- dispatch_once单例初始化
- 【学习笔记】【C语言】变量
- iOS多线程编程Part2/3-NSOperation
- IOS笔记之UIKit_UITextField
- iOS应用开发中图片的拉伸问题解决方案
- iOSUI基础05
- swift学习之UI控件(一)
- IOS多线程开发之线程的状态
- 创建本地SVN版本库以及将SVN导入GIT
- NSOperation
- UIDynamic基础认识
- ios开发-UI-UIScrollView
- iOS加载启动图的时候隐藏statusbar+指定启动图显示多少秒
- Swift 共享文件操作小结(iOS 8 +)
- UIButton-初识IOS
- 【读书笔记】iOS网络-负载
- ios将Log日志重定向输出到文件中保存
- 显示和隐藏Mac隐藏文件的终端命令
- iOSProgrammingViewControllers视图控制器
- iOS——Swift开发中的单例设计模式(摘译,非原创)
- iOS系列译文:自定义CollectionView布局
- 最新模仿ios版微信应用源码
iOS应用开发中UITabBarController标签栏控制器使用进阶
做了这么长时间的ios开发了,最基本的UITabBarController和UINavigationController都用了好长时间了,总是改现成的代码,或者各种自定义控件的修改,用的都有些混乱了,呵呵。还是自己做个demo再复习一下吧,记录下来以备后续翻查。
一、UITabBarController和UINavigationController的联合使用
这种方法最常见,好像一般有tabbar都会有naviBar。一般使用,
1. 在appDelegate里面创建UITabBarController; 准备好ViewControllerArray等其它数据变量;
[/code]
UITabBarController *tabBarController = [[UITabBarController alloc] init];
tabBarController.delegate = nil;
UINavigationController *naviController = nil;
NSMutableArray *controllerArray = [[NSMutableArray alloc] initWithCapacity:3];
[/code]
2.创建每个tab对应的viewController和以该viewController为根视图控制器的UINavigationController; 将naviController添加到数组中; 定制每个UITabBarItem,可以设置图片、文字、标记等;
如下:tab1和tab3的创建类似
复制代码 代码如下:
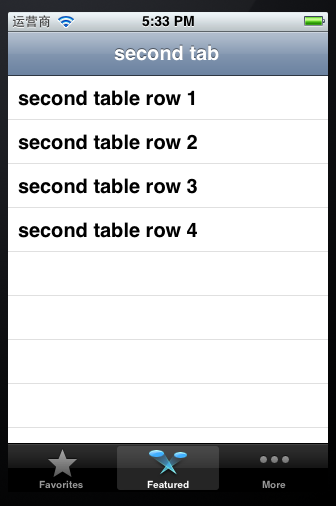
SecondTabViewController *secondController = [[SecondTabViewController alloc] initWithStyle:UITableViewStylePlain];
naviController = [[UINavigationController alloc] initWithRootViewController:secondController];
// UITabBarItem *secondTab = [[UITabBarItem alloc] initWithTitle:nil image:[UIImage imageNamed:@"tab2.png"] tag:2];
UITabBarItem *secondTab = [[UITabBarItem alloc] initWithTabBarSystemItem:UITabBarSystemItemFeatured tag:2];
naviController.tabBarItem = secondTab;
secondController.navigationItem.title = @"second tab";
[secondTab release];
[controllerArray addObject:naviController];
[naviController release];
[secondController release];</span>
3. 将viewController数组设置给tabBarController,tabBarController添加到窗口显示。
复制代码 代码如下:
tabBarController.viewControllers = controllerArray;
[controllerArray release];
[self.window addSubview:tabBarController.view];
完成,显示效果如下。

4. UITabBarController和naviController不是一定绑定在一起用的。
复制代码 代码如下:
naviController.tabBarItem = secondTab;
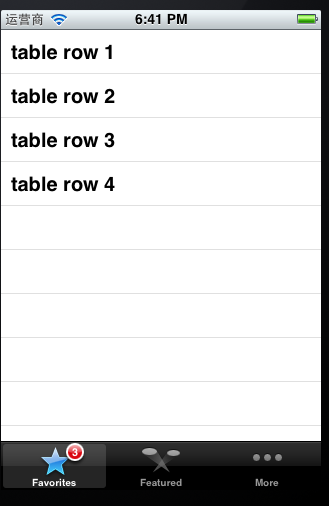
从上面这句话就可以看出来,我理解这句才是将tab和viewController连接起来的关键,但是每个UIViewController本身都会自动创建一个tabBarItem,因此secondController.tabBarItem = secondTab也是可以的,这就可以实现只有UITabBarController,而没有naviController。如下图所示

UITabBarController.h中的相关定义,可以验证这种用法。
复制代码 代码如下:
@interface UIViewController (UITabBarControllerItem)
@property(nonatomic,retain) UITabBarItem *tabBarItem; // Automatically created lazily with the view controller's title if it's not set explicitly.
二、UITabBar和UITabBarItem的一些设置。
设置UITabBar的背景,网上流传最多的方法是取出UITabBar之后,对其layer层的contents属性进行修改,将其设置为自定义的一张背景图片,如下面注视掉的代码。不过看了头文件之后我觉得这种方法好像挺奇怪的,虽然也没几句代码,不过感觉不用这么复杂吧??取出UITabBar之后直接设置backgroundImage不就行了么?或许有潜在问题我不知道吧,先了解有这种方法吧,以备不时之需。
复制代码 代码如下:
UITabBar *tabBar = (UITabBar*)[[tabBarController.view subviews] objectAtIndex:1];
//tabBar.layer.contents = (id)[UIImage imageNamed:@"tabbar_background.png"].CGImage;
tabBar.backgroundImage = [UIImage imageNamed:@"tabbar_background.png"];
UITabBarItem有两种初始化方式,本代码中使用的是设置系统tab类型,另一种更常用的应该是定制tab标题和图片,如上注释掉的语句。
复制代码 代码如下:
//UITabBarItem *secondTab = [[UITabBarItem alloc] initWithTitle:nil image:[UIImage imageNamed:@"tab2.png"] tag:2];
UITabBarItem *secondTab = [[UITabBarItem alloc] initWithTabBarSystemItem:UITabBarSystemItemFeatured tag:2];
可以通过下面的函数设置选中、未选中的图片; 字符串badgeValue是可以在tab右上角的红色小圆圈内的文字内容
复制代码 代码如下:
<span style="font-size:16px;"> [firstTab setFinishedSelectedImage:[UIImage imageNamed:@"tab1_selected.png"] withFinishedUnselectedImage:[UIImage imageNamed:@"tab1.png"]];
firstTab.badgeValue = @"3";

这几个控件的属性不多,还有可以UITabBar选中的图片、颜色等等,通过头文件注释看到的,没有实际使用,大概使用方法都差不多。
三、自定义UITabBar
实际工作中,还是用纯粹的自定义TabBar的情况更多,在此先写写思路,整理好代码再来记录。
第一种思路,也是我现在使用的,自定义TabBar继承UIView,每个tab是一个button,从而可以设置选中/未选中的图片,将button都添加到TabBar里面,button的点击事件就可以作为tab是否被选中的触发事件,通过delegate通知外面到底选中了哪个tab。
第二种思路,既然UITabBar本身就是UIView的子类,应该可以重写drawRect函数完全自绘吧,这也是一种思路,好像一些开源代码也是这样做的。
还有一些情况,可能使用UIToolBar来代替TabBar更合适,toolBar可以设置自定义的view,那就好办了,估计搞个UIActivityIndicatorView之类的设置上去都行,下一步要看看这块的文档和代码,尝试一下,写了demo再来记录。
四、总结UITabBarController的注意点
使用UITabBarController和使用一般的控制器一样,比如可以设置
复制代码 代码如下:
self.window.rootViewController = tabBarController;
使用addChildViewController方法可以给其添加子控制器。每个子控制器对应一个UITabBarButton,也就是在UITabBarController下面的选项。此时如果想要改变UITabBarButton的内容,比如想要设置title, image等内容,需要在其对应的子控制器里面通过修改tabBarItem的属性来设置内容。
复制代码 代码如下:
// JYViewController.m -> 是UITabBarController的子控制器
- (void)viewDidLoad
{
[super viewDidLoad];
self.tabBarItem.title = @"选项1";
self.tabBarItem.badgeValue = @"1";
}
这一点和UINavigationController是类似的,在使用UINavigationController的时候,我们在当前显示的控制器(也就是栈顶的控制器)中通过修改navigationItem来设置导航栏中的内容。
self.navigationItem.leftBarButtonItem = ...;
也就是说,使用UINavigationController和UITabBarController的时候:
在其对应的控制器里面修改导航栏和tabBar的内容。
通过修改tabBarItem和__navigationItem__的属性来设置导航栏和tabBar的内容。其实tabBarItem和navigationItem属于模型(从NSObject继承,以...Item结尾的可以都推测为模型?),此时我们通过修改模型来修改view中显示的内容。
当UINavigationController和UITabBarController同时使用的时候,如果让navigationController作为self.window.rootViewController,然后再让tabBarController成为navigationController的子控制器,这么做是合法的,但是会有一些问题。
因为前面说过,navigationBar上显示的内容是通过在其当前显示的子控制器中修改的,但是此时navigationController直接显示的子控制器是tabBarController,所以当进入不同的界面的时候,我们希望navigationBar上的内容(比如title)改变,但是此时是做不到的,因为我们无法在UITabBarController中修改navigationBar的内容。
所以一般来说我们会让tabBarController作为根控制器,如果其他自定义的子控制器需要navigationController,那么就让每个自定义的控制器对应的navigationController作为tabBarController的子控制器,然后让自定义的控制器作为navigationController的子类。这样就可以在自定义控制器中修改navigationController的navigationBar显示内容。
- [iOS微博项目-3.2]-发送微博
- 详解iOS开发中使用storyboard创建导航控制器
- 【iOS】Alamofire库在iOS7下设置Head无效的
- ios开发:代理设计模式
- IOS开发之TabBarItem&NavigationBarIte
- 详解Obejective-C中将JSON数据转为模型的方
- Mac下同时安装多个版本的JDK