- iOS中远程推送实现—在Apple的生产环境上测试PushNotifications功能
- swift动画小试牛刀
- iOS应用UI开发中的字体和按钮控件使用指南
- iOS的UI开发中Modal的使用与主流应用UI结构介绍
- iOS模仿电子书首页实现书架布局样式
- iOS移除地图所有大头针
- [iOS基础控件-6.7]微博展示使用代码自定义TableCell(动态尺寸)
- IOS开发之CocoaPods安装和使用教程
- iOS开发应用学习笔记
- iOSUIViewController-视图控制器、UIViewController生命周期
- 修改蓝牙设备的名称
- Xcode5中如何切换Storyboards为xib
- Swift语言指南(五)--数字字面量和数字类型转换
- AVCapture编程理解
- Objective-C的内省(Introspection)小结
- ios开发-常用网络
- IOS学习笔记2015-04-15控制器数据反向传值
- iOS沙盒路径获取,创建文件
- 浅析Objective-C字面量
- iOS高级开发runtime(三)
- iOS-Apple零配置网络协议Bonjour的使用?
- iOS开发-语法篇-block详解
- iOS的SandBox的结构研究
- Swift设置navigationbar属性相关
- 通过KVO解除类之间的耦合
- 使用面向iOS的本机插件扩展PhoneGap
- NSString初始化及其内存管理
- xmpp好友请求5
- 详解iOS时间选择框
- iOS开发日记24-RunLoop终极篇
iOS实现简单的抽屉效果
说到抽屉效果在iOS中比较有名的第三方类库就是PPRevealSideViewController。一说到第三方类库就自然而然的想到我们的CocoaPods,本文用CocoaPods引入PPRevealSideViewController,然后在我们的工程中以代码结合storyboard来做出抽屉效果。
一.在工程中用CocoaPods引入第三方插件PPRevealSideViewController.
(1).在终端中搜索PPRevealSideViewController的版本

(2).在Podfile中添加相应的版本库

(3).之后保存一下Podfile文件,然后执行pod install即可
二、为我们的工程添加pch文件
因为用的是XCode6, 上面默认是没有pch文件的,如果我们想使用pch文件,需要手动添加,添加步骤如下
1.在XCode6中是么有pch文件的,如下图

2.创建pch文件


3.配置pch文件
(1)、找工程的Targets->Build Settings->Apple LLVM 6.0 - Language

(2)在Prefix Header下面的Debug和Release下添加$(SRCROOT)/工程名/pch文件,入下图

三、使用PPRevealSideViewController来实现抽屉效果
当然了首先在pch文件中引入我们的第三方类库,然后使用即可
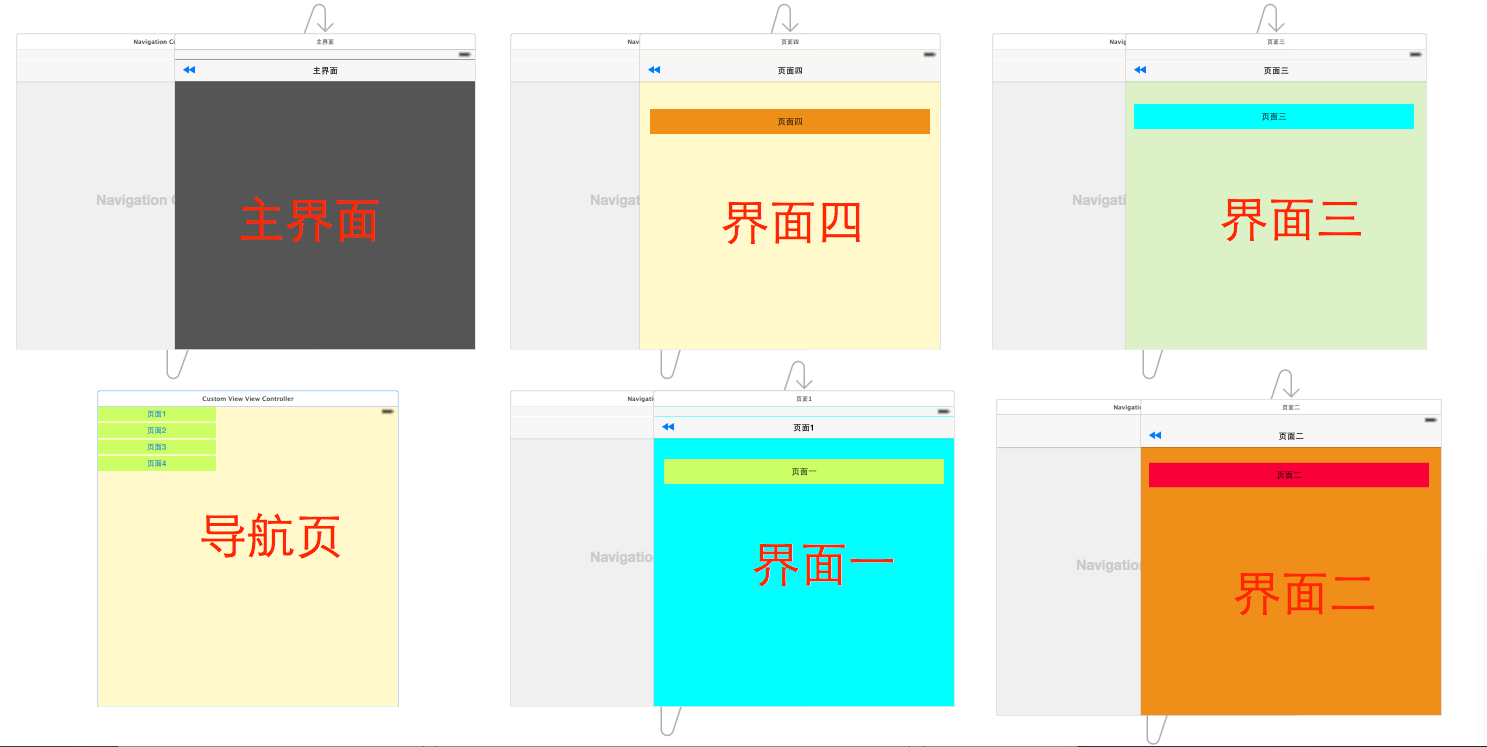
1.在storyboard拖出来我们要用的视图控制器,点击主界面上的按钮会以抽屉的形式展示出导航页,然后在导航页导航到各个界面,之后在从各个页面回到主界面

2.在AppDelegate中初始化我们的PPRevealSideViewController并设置为启动页面代码如下:
- (BOOL)application:(UIApplication *)application didFinishLaunchingWithOptions:(NSDictionary *)launchOptions {
  // Override point for customization after application launch.

  self.window = [[UIWindow alloc] initWithFrame:[[UIScreen mainScreen] bounds]];

  //获取主视图的导航控制器
  UIStoryboard *storyboard = [UIStoryboard storyboardWithName:@"Main" bundle:[NSBundle mainBundle]];
  UIViewController *vc = [storyboard instantiateViewControllerWithIdentifier:@"NavigationController"];

  //新建PPRevealSideViewController,并设置根视图(主页面的导航视图)
  PPRevealSideViewController *sideViewController = [[PPRevealSideViewController alloc] initWithRootViewController:vc];

  sideViewController.fakeiOS7StatusBarColor = [UIColor whiteColor];

  //把sideViewController设置成根视图控制器
  self.window.rootViewController = sideViewController;

  [self.window makeKeyAndVisible];

  return YES;
}
3.在主界面使用PPRevealSideViewController来推出导航页
- (IBAction)tapItem:(id)sender {

  UIStoryboard *storybaord = [UIStoryboard storyboardWithName:@"Main" bundle:[NSBundle mainBundle]];
  UITableViewController *table = [storybaord instantiateViewControllerWithIdentifier:@"CustomViewViewController"];
  [self.revealSideViewController pushViewController:table onDirection:PPRevealSideDirectionLeft animated:YES];
}
4.在导航页点击不同的按钮使用PPRevealSideViewController跳转到不同的controller
- (IBAction)tap1:(id)sender {
   UIStoryboard *storyboard = [UIStoryboard storyboardWithName:@"Main" bundle:[NSBundle mainBundle]];
  UIViewController *one = [storyboard instantiateViewControllerWithIdentifier:@"one"];
  [self.revealSideViewController popViewControllerWithNewCenterController:one animated:YES];
}

- (IBAction)tap2:(id)sender {

  UIStoryboard *storyboard = [UIStoryboard storyboardWithName:@"Main" bundle:[NSBundle mainBundle]];
  UIViewController *one = [storyboard instantiateViewControllerWithIdentifier:@"two"];
  [self.revealSideViewController popViewControllerWithNewCenterController:one animated:YES];

}

- (IBAction)tap3:(id)sender {
  UIStoryboard *storyboard = [UIStoryboard storyboardWithName:@"Main" bundle:[NSBundle mainBundle]];
  UIViewController *one = [storyboard instantiateViewControllerWithIdentifier:@"three"];
  [self.revealSideViewController popViewControllerWithNewCenterController:one animated:YES];
}

- (IBAction)tap4:(id)sender {
  UIStoryboard *storyboard = [UIStoryboard storyboardWithName:@"Main" bundle:[NSBundle mainBundle]];
  UIViewController *one = [storyboard instantiateViewControllerWithIdentifier:@"four"];
  [self.revealSideViewController popViewControllerWithNewCenterController:one animated:YES];
}
5.各个页面返回到主界面的代码如下:
- (IBAction)tapPage:(id)sender {
  UIStoryboard *storyboard = [UIStoryboard storyboardWithName:@"Main" bundle:[NSBundle mainBundle]];

  UIViewController *view = [storyboard instantiateViewControllerWithIdentifier:@"NavigationController"];

  [self.revealSideViewController popViewControllerWithNewCenterController:view animated:YES];
}
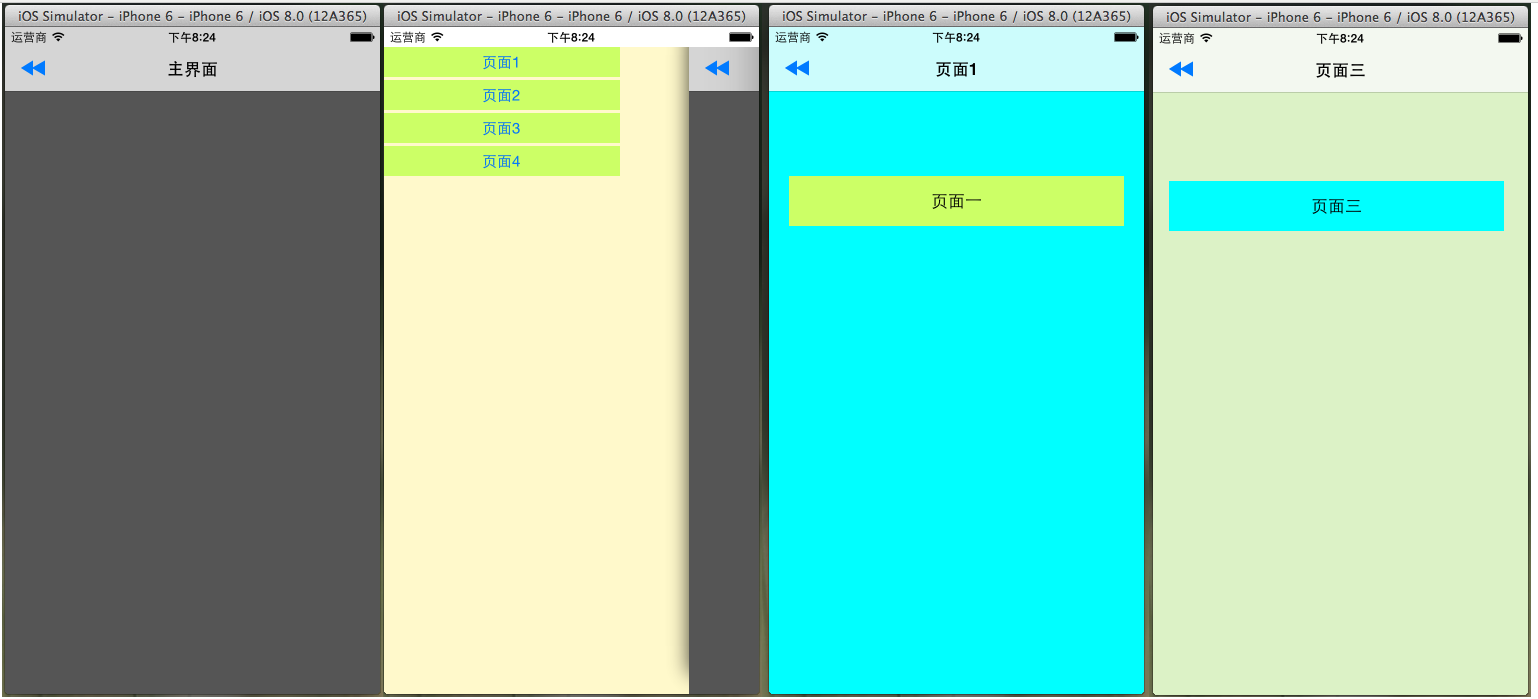
四.到此效果实现完毕,下面是效果图:

以上就是本文的全部内容,希望对大家的学习有所帮助。
- 上一篇文章: iOS实现侧拉栏抽屉效果
- 下一篇文章: iOS App开发中导航栏的创建及基本属性设置教程
- iOS_Objective-C_控件中的字体加粗
- iOS App开发中UIViewController类的使用教程
- Objective-C——Block
- 获取UIWebView中用户所点击的图片URL
- 将自己写的库上传到cocoapods(2015)
- iphone的safari浏览器中实现全屏浏览的方法
- GPUImage简单滤镜使用(一)