
- SEO不仅是搜索引擎优化技术,更重要是策划
- SEO插件使用教程:WordPress SEO by Yoast
- 一个自媒体人的深夜感想
- 互联网站长大会:潘剑峰称要靠淘宝找位置
- 新媒体又要地震了?广告圈又到末日了?
- 微博营销:如何快速增加你的粉丝数量
- 从“马云不做电子商务五年后你会后悔”想开去
- Linux爱好者:西部数码云主机初体验
- 博客赚钱 你可能不知道的博客赚钱的真相
- 浅谈如何打造一个成功的博客 —— 基础篇
- 数据同步工具Dropbox与Live Mesh非专业评测
- 经验探讨 用户体验与搜索引擎优化的结合
- 用好WordPress标签生成的样式
- 域名搜索工具汇总
- 不是所有的排名下降都是降权
- Java实现网易163邮箱好友通讯录的解析功能(带源码)
- 与草根站长分享资源类网站组建盈利过程
- 近期社区推广与优化工作的总结及反思
- 没钱没技术,站长应该如何运营网站(二)
- 系统还原也简单 常用Linux系统还原工具推荐
- Joomla! 1.7详细安装步骤
- 戴仁光:武林大会杭州站得到的淘宝客经验
- 别忘了还有站长帮手
- 淘宝运营之借火篇:认准10个关键点
- 用户体验的衡量指标
- 致那些和我一样相信一定会成功的天猫店主
- 新手建站四个步骤 让网站排名迅速飞起来
- 用户体验 网站壮大的基础
- 淘宝直通车效果衡量之点击转化率的影响因素
- 站长分享网站日IP上1000的经验总结
用Varnish和Memcached给WordPress网站提速

Varnish是一款高性能的缓存加速器,Varnish把数据存放在服务器的内存中,利用内存可以极大的提高PHP页面执行速度,可以设置0~60秒的精确缓存时间,32位的机器支持的缓存文件最大为2 GB。
Varnish采用VCL的配置,而且具有强大的管理功能,如top、stat、admin、lis,管理方式比较灵活。Varnish的状态机设计不仅巧妙,结构也很清晰,利用二叉堆管理缓存文件,即可达到随时删除的目的。
Memcached是一个高性能的分布式内存对象缓存系统,通过在内存中缓存数据和对象来减少读取数据库的次数,从而提高动态、数据库驱动网站的速度。Memcached对于减少MysqL数据查询压力非常有帮助。
由于Varnish采用了Visual Page Cache技术,所有缓存的数据都直接从内存读取,而Squid从硬盘读取缓存的数据,所以Varnish在访问速度方面会更快一些。但是Varnish在高并发状态下,CPU、I/O和内存等资源的开销高于Squid。
目前Varnish3.0版本解决了服务器重启后Varnish缓存消失的问题,性能优化上有了更大的提升。本篇文章就来分享一下利用Varnish和Memcached缓存来给Wordpress加速,因为要用到内存,所以比较适合那些大内存的服务器。
用Varnish和Memcached缓存给Wordpress网站提速-内存级加速
一、Varnish安装方法
1、Varnish官网:
官方网站:https://www.varnish-cache.org/
2、对于Centos 5的,可以执行以下命令来安装:
rpm --nosignature -i http://repo.varnish-cache.org/redhat/varnish-3.0/el5/noarch/varnish-release/varnish-release-3.0-1.el5.centos.noarch.rpm
yum install varnish
3、对于是Centos 6的,可以执行以下命令来安装:
rpm --nosignature -i http://repo.varnish-cache.org/redhat/varnish-3.0/el6/noarch/varnish-release/varnish-release-3.0-1.el6.noarch.rpm
yum install varnish
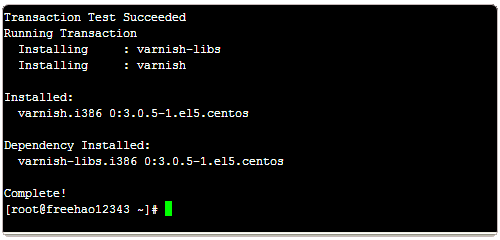
4、如果版本搞错,就会出现如下提示错误:
error: Failed dependencies:
rpmlib(FileDigests) <= 4.6.0-1 is needed by varnish-release-3.0-1.el6.noarch
rpmlib(PayloadIsXz) <= 5.2-1 is needed by varnish-release-3.0-1.el6.noarch
Error: Missing Dependency: libedit.so.0 is needed by package varnish-3.0.5-1.el5.centos.i386 (varnish-3.0)
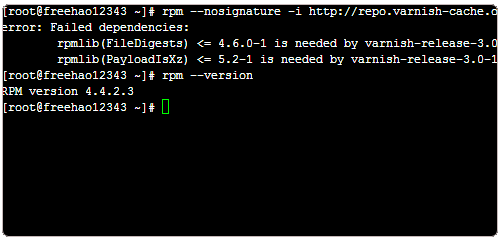
5、Centos 5安装时还会提示有依赖关系不能解决,解决的办法就是添加扩展的YUM 源,执行以下命令:
rpm -ivh http://apt.sw.be/redhat/el5/en/i386/rpmforge/RPMS/rpmforge-release-0.5.1-1.el5.rf.i386.rpm (32位)
rpm -ivh http://apt.sw.be/redhat/el5/en/x86_64/rpmforge/RPMS/rpmforge-release-0.5.2-2.el5.rf.x86_64.rpm (64位)
yum clean allyum update
6、对于是Debian系统,可以执行以下命令来安装:
curl http://repo.varnish-cache.org/debian/GPG-key.txt | apt-key add -echo "deb http://repo.varnish-cache.org/debian/ wheezy varnish-3.0" >> /etc/apt/sources.list
apt-get update
apt-get install varnish
6、对于是Ubuntu系统,可以执行以下命令来安装:
curl http://repo.varnish-cache.org/debian/GPG-key.txt | sudo apt-key add -echo "deb http://repo.varnish-cache.org/ubuntu/ precise varnish-3.0" | sudo tee -a /etc/apt/sources.listsudo
apt-get updatesudo
apt-get install varnish
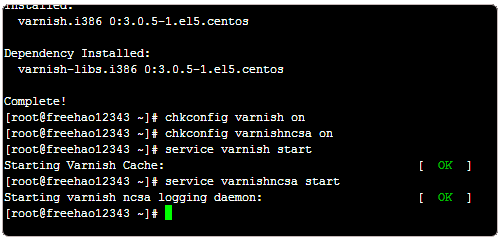
7、设置Varnish开机启动,执行:chkconfig varnish on和chkconfig varnishncsa on
8、启动Varnish的命令是:service varnish start和service varnishncsa start
二、Varnish相关配置
1、设置好Varnish缓存规则。默认是/etc/varnish/default.vcl,大家可以下载这个Varnish WordPress配置文件覆盖原来的,地址:http://centos.googlecode.com/files/default.vcl。源码内容:
- # This is a basic VCL configuration file for varnish. See the vcl(7)
- # man page for details on VCL syntax and semantics.
- # Default backend definition. Set this to point to your content
- # server.
- backend default {
- .host = "127.0.0.1";
- .port = "8080";
- }
- acl purge {
- "localhost";
- "127.0.0.1";
- }
- # Below is a commented-out copy of the default VCL logic. If you
- # redefine any of these subroutines, the built-in logic will be
- # appended to your code.
- sub vcl_recv {
- # Only cache the following site
- if (req.http.host ~ "(amhg.freehao123.info)") {
- set req.backend = default;
- } else {
- return (pass);
- }
- if (req.request == "PURGE") {
- if (!client.ip ~ purge) {
- error 405 "Not allowed.";
- }
- return (lookup);
- }
- if (req.restarts == 0) {
- if (req.http.x-forwarded-for) {
- set req.http.X-Forwarded-For =
- req.http.X-Forwarded-For + ", " + client.ip;
- } else {
- set req.http.X-Forwarded-For = client.ip;
- }
- }
- if (req.request != "GET" &&
- req.request != "HEAD" &&
- req.request != "PUT" &&
- req.request != "POST" &&
- req.request != "TRACE" &&
- req.request != "OPTIONS" &&
- req.request != "DELETE") {
- /* Non-RFC2616 or CONNECT which is weird. */
- return (pipe);
- }
- if (req.request != "GET" && req.request != "HEAD") {
- /* We only deal with GET and HEAD by default */
- return (pass);
- }
- if (req.http.Authorization || req.http.Cookie ~ "wordpress_logged" || req.http.Cookie ~ "comment_") {
- /* Not cacheable by default */
- return (pass);
- }
- return (lookup);
- }
- sub vcl_pipe {
- # Note that only the first request to the backend will have
- # X-Forwarded-For set. If you use X-Forwarded-For and want to
- # have it set for all requests, make sure to have:
- # set bereq.http.connection = "close";
- # here. It is not set by default as it might break some broken web
- # applications, like IIS with NTLM authentication.
- return (pipe);
- }
- sub vcl_pass {
- return (pass);
- }
- sub vcl_hash {
- hash_data(req.url);
- if (req.http.host) {
- hash_data(req.http.host);
- } else {
- hash_data(server.ip);
- }
- return (hash);
- }
- sub vcl_hit {
- if (req.request == "PURGE") {
- purge;
- error 200 "Purged.";
- }
- return (deliver);
- }
- sub vcl_miss {
- if (req.request == "PURGE") {
- purge;
- error 200 "Purged.";
- }
- return (fetch);
- }
- sub vcl_fetch {
- if (beresp.ttl <= 0s ||
- beresp.http.Set-Cookie ||
- beresp.http.Vary == "*") {
- /*
- * Mark as "Hit-For-Pass" for the next 2 minutes
- */
- set beresp.ttl = 120 s;
- return (hit_for_pass);
- }
- set beresp.ttl = 1d;
- return (deliver);
- }
- sub vcl_deliver {
- return (deliver);
- }
- sub vcl_error {
- set obj.http.Content-Type = "text/html; charset=utf-8";
- set obj.http.Retry-After = "5";
- synthetic {"
- <?xml version="1.0" encoding="utf-8"?>
- <!DOCTYPE html PUBLIC "-//W3C//DTD XHTML 1.0 Strict//EN"
- "http://www.w3.org/TR/xhtml1/DTD/xhtml1-strict.dtd">
- <html>
- <head>
- <title>"} + obj.status + " " + obj.response + {"</title>
- </head>
- <body>
- <h1>Error "} + obj.status + " " + obj.response + {"</h1>
- <p>"} + obj.response + {"</p>
- <h3>Guru Meditation:</h3>
- <p>XID: "} + req.xid + {"</p>
- <hr>
- <p>Varnish cache server</p>
- </body>
- </html>
- "};
- return (deliver);
- }
- sub vcl_init {
- return (ok);
- }
- sub vcl_fini {
- return (ok);
- }
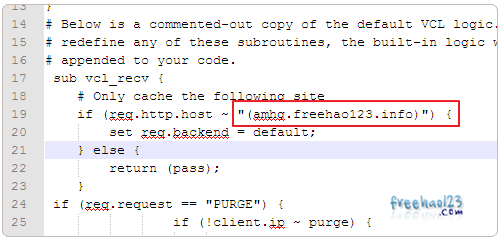
2、下载下来的default.vcl你需要调整的地方有一处,就是将域名更改为自己要使用Varnish缓存的域名。
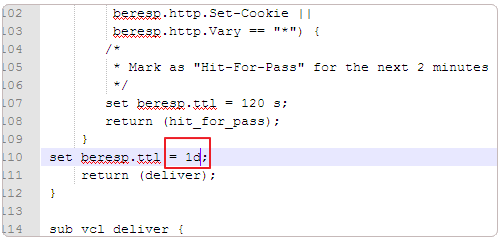
3、另外default.vcl还设置缓存时间,单位是s(秒),h(小时),d(天)。
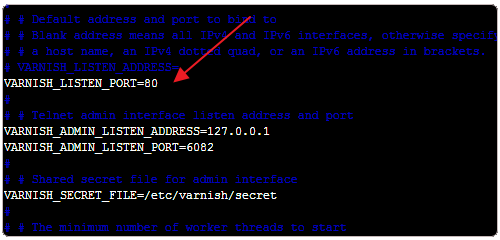
4、配置Varnish的访问端口。Varnish配置默认的访问端口不是80端口,因此需要修改/etc/sysconfig/varnish配置文件,把端口设置为80。
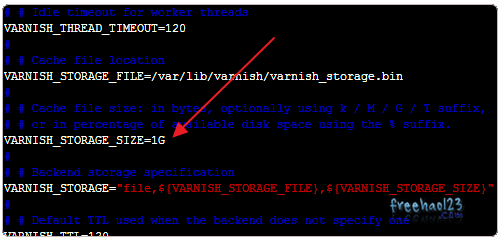
5、在/etc/sysconfig/varnish这个文件中还可以设置Varnish缓存大小,默认是1GB。
- 上一篇文章: 酒香也怕巷子深,网站布局带你走出排名深巷
- 下一篇文章: 专访“什么值得买”CEO:导购的想象空间无限