·您现在的位置: 云翼网络 >> 文章中心 >> 网站建设 >> 网站建设开发 >> ASP.NET网站开发 >> ASP.NET状态的传递和保存
- K & DN 的前世今生(微软开源命名变革)
- 客户端回调实现gridView无刷新分页
- ASP.NET通用权限组件思路设计
- MongoDB学习笔记(一)——Windows下安装MongoDB
- asp.net中WebResponse跨域访问示例
- C#基础----Linq之List<T>篇
- ASP.NET设计中的性能优化问题
- ASP.NET 2.0快速入门(11):ASP.NET 2.0代码国际化
- 调试.NET程序OutOfMemoryException(转载)
- 通过后台验证后提交表单,阻止表单默认提交
- SQL Artisan多表查询和统计
- 我的网络兼职MVC项目开发-数据绑定
- 简单多条件动态查询的实现
- ASP.NET 表单验证方法与客户端(浏览器)服务器交互机制的故事
- C#基础---委托的使用
- 我也要谈谈大型网站架构之系列(3)——死了都要说的缓存
- asp.net中过滤器的两种写法
- asp.net关于Repeater控件中的全选,批量操作
- 一个简单的小例子让你明白c#中的委托-终于懂了!
- 知识日记1
- 有关TextBox中输入字符控制的一种解决办法
- 单元测试资料汇总
- asp.net的一个bug的发现和解决
- 随机生成验证码
- 使用ASP.NET Web Api构建基于REST风格的服务实战系列教程【六】——实现资源间的关联
- asp.net 2.0 与1.1 在生成的前台页面内容方面的一点不同
- ASP.NET系列:单元测试之Log4Net
- 05.GitHub实战系列~5.发布版本之分支操作+Tag讲解2015-12-14
- Windows 2003 Server 中DOTNET程序访问COM组件
- [Asp.net 5] Localization-简单易用的本地化
ASP.NET状态的传递和保存
1,HTTP协议是无状态的。服务器不会记住上次给浏览器的处理结果,如果需要上次处理结果(上次状态)就需要浏览器把处理结果值(上次状态)再次给服务器。
2,URL传值:通过URL参数或者通过Form表单进行页面件的传值 (不能做到很自由的存取和读取,而且不安全)
3,Cookie :①Cookie可以用来进行更加自由的数据的存取和读取。
②Cookie是和站点相关的,自己域名写的只有自己的域名才可以读取。
③客户端向服务器发送请求的时候 处理发送Form表单信息以外还会把和站点有关的所有的Cookie发送给服务器,是强制的。
④服务器返回的数据处理HTML数据以外,还会返回修改的Cookie,浏览器拿到修改后的Cookie更新到本地的Cookie
⑤服务器端使用Cookie案例,记住用户名功能:
A,设置页面值: Response.SetCookie(new HttpCookie("UserName",username))
B,读取页面值: username=Request.Cookies["UserName"].Value
⑥浏览器关闭以后Cookie的声明周期到期,也就是Cookie的默认生命周期是浏览器的生命周期。可以通过设置Expires属性设置Cookie的过期时间:Cookie.Expires=DateTime.Now.AddDays(-1)
⑦Cookie在客户端是以键值对存在的
4,Cookie缺点:①客户端额可以手动清楚Cookie 所以Cookie里面存放的信息是可有可无的信息
②浏览器对 Cookie 的大小有限制,因此只有不超过 4096 字节才能保证被接受
③机密信息不能放到Cookie里面
④Cookie不能跨浏览器
5,Cookie的写和读: A,新建CookieTest.html页面并添加 两个按钮分别用于Cookie的读和写

<!DOCTYPE html>
<html xmlns="http://www.w3.org/1999/xhtml">
<head>
<meta http-equiv="Content-Type" content="text/html; charset=utf-8" />
<title></title>
</head>
<body>
<form>
<input type="submit" name="Read" value="读取Cookie" />
<input type="submit" name="Write" value="写入Cookie" />
<br />
读取出来的Cookie: $Model.CookieValue
</form>
</body>
</html>
View Code
B,建立对应的CookieTest.ashx页面 实现Cookie的新建写入本地以及读取Cookie的值

using System;
using System.Collections.Generic;
using System.Linq;
using System.Web;

namespace HttpNoStatus
{
    /// <summary>
    /// HttpCookie 的摘要说明
    /// </summary>
    public class CookieTest : IHttpHandler
    {

        public void PRocessRequest(HttpContext context)
        {
            context.Response.ContentType = "text/html";

            //if else 判断是点击的那个按钮
            if (!string.IsNullOrEmpty(context.Request["Read"]))
            {
                if (context.Request.Cookies["Age"] != null)
                {
                    HttpCookie cookie = context.Request.Cookies["Age"];
                    string strValue = cookie.Value;
                    var data = new { CookieValue = strValue };

                    //加载模板页面并传递 Cookie Value的值
                    string strHtml = Common_Nvelocity.RenderHTML("CookieTest.html", data);
                    context.Response.Write(strHtml);
                }
                else
                {
                    context.Response.Write("cookie 不存在");
                }
            }
            else if (!string.IsNullOrEmpty(context.Request["Write"]))
            {
                //写入新的Cookie
                HttpCookie acookie = new HttpCookie("Age");
                acookie.Value = "25";
                acookie.Expires = DateTime.MaxValue;
                context.Response.Cookies.Add(acookie);

                //Cookie不存在 直接加载模板页面
                string strHtml = Common_Nvelocity.RenderHTML("CookieTest.html", null);
                context.Response.Write(strHtml);

            }

            else
            {
                //第一次加载页面
                string strHtml = Common_Nvelocity.RenderHTML("CookieTest.html", null);
                context.Response.Write(strHtml);
            }
        }

        public bool IsReusable
        {
            get
            {
                return false;
            }
        }
    }
}
View Code
6,Cookie最主要的一个功能是保存用户的登陆名,这样用户在下次登陆的时候系统就可以自动填写登陆名称
A,新建LoginCookie.html页面,页面中添加我们经常见到的 用户名,用户密码,登陆
登陆页面第一次加载的时候,设置默认的登陆名为空,登陆成功以及再次登陆的时候系统就自动补充登陆用户名

<!DOCTYPE html>
<html xmlns="http://www.w3.org/1999/xhtml">
<head>
    <meta http-equiv="Content-Type" content="text/html; charset=utf-8" />
    <title></title>
</head>
<body>
    <form action="LoginCookie.ashx" method="post">
        <table>
            <tr>
                <td>登陆名</td>
                <td>
                    <input type="text" name="UserName" value="$Model.LoginUser" /></td>
            </tr>
            <tr>
                <td>密码</td>
                <td>
                    <input type="passWord" name="Password" /></td>
            </tr>
            <tr>
                <td>
                    <input type="submit" name="Login" value="登陆" /></td>
                <td></td>
            </tr>
        </table>
    </form>
</body>
</html>
View Code
B, 新建对应的LoginCookie.ashx页面,实现把用户名读取出来并写入Cookie "ckLoginUser"

using System;
using System.Collections.Generic;
using System.Linq;
using System.Web;

namespace HttpNoStatus
{
    /// <summary>
    /// LoginCookie 的摘要说明
    /// </summary>
    public class LoginCookie : IHttpHandler
    {

        public void ProcessRequest(HttpContext context)
        {
            context.Response.ContentType = "text/html";

            //加载页面直接显示 页面
            if (context.Request.Form["Login"] == null)
            {
                string strHtml = "";
                var data = new { LoginUser = "" }; //登陆账号默认为空

                //判断Cookie是否存在,如果存在 把Cookie的值传递到HTML页面,如果不存在就是默认的空
                if (context.Request.Cookies["ckLoginUser"] != null)
                {
                    data = new { LoginUser = context.Request.Cookies["ckLoginUser"].Value.ToString() };
                }
                strHtml = Common_Nvelocity.RenderHTML("LoginCookie.html", data);
                context.Response.Write(strHtml);
            }
            else
            {
                //用户登陆,保存用户名到Cookie
                HttpCookie LoginUser = new HttpCookie("ckLoginUser");
                LoginUser.Value = context.Request.Form["UserName"];
                LoginUser.Expires = DateTime.Now.AddDays(30);
                context.Response.Cookies.Add(LoginUser);
                //加载页面直接显示 页面
                string strHtml = Common_Nvelocity.RenderHTML("LoginCookie.html", new { LoginUser = context.Request.Form["UserName"] });
                context.Response.Write(strHtml);
            }

        }

        public bool IsReusable
        {
            get
            {
                return false;
            }
        }
    }
}
View Code
7,以上方法把登陆账号以Cookie的形式存放在客户端,这样每一次的请求就可以带出用户登陆名称了
有一种情况: 用户登陆成功以后就可以访问网站的其他所有页面,其他页面就需要先判断用户是否登陆成功。
如果登陆成功为True放到Cookie中,这样的客户端就可以进行篡改把False改为True从而可以非法访问为授权页面了,这样放到Cookie就不安全了。
如果登陆成功放到服务器端,那么网站的多个页面就可以直接读取到这个值,而且是安全的不会被客户端篡改的了。
8,session原理: 把数据Value值存储在服务器端并在客户端存放Value对应的ID 。(ID,Value)都存放服务器 另外把ID以Cookie的形式存放客户端。这样就可以从客户端Cookie中抓取ID,然后从服务器端读取到ID对应的Value。
10,下面示例以Session原理实现页面判断用户是否有成功登陆:成功登陆的用户可以对特定页面进行访问、如果没有成功登陆就跳转到登陆页面。
A. 添加类 SessionMgr.cs 在服务器端存储 键值对 ID/Value

using System;
using System.Collections.Generic;
using System.Linq;
using System.Web;

namespace HttpNoStatus
{

    public class SessionMgr
    {
        //定义键值对,存储登陆信息
        private static Dictionary<Guid, string> KeyValue = new Dictionary<Guid, string>();

        //设置键值对的值
        public static void SetKeyValue(Guid id, string value)
        {
            KeyValue[id] = value;
        }

        /// <summary>
        /// 检查客户端传递过来的键值对是否存在
        /// </summary>
        /// <param name="id"></param>
        /// <returns></returns>
        public static bool IfIdExist(Guid id)
        {
            return KeyValue.Keys.Contains(id);
        }

        //返回服务器端ID对应的Value值
        public static string GetValue(Guid id)
        {
            return KeyValue[id].ToString();
        }


    }
}
View Code
B. 添加 LoginSession.ashx 判断用户是否登陆成功,如果登陆成功把存储对应的键值对的值

using System;
using System.Collections.Generic;
using System.Linq;
using System.Web;

namespace HttpNoStatus
{
    /// <summary>
    /// LoginSession 的摘要说明
    /// </summary>
    public class LoginSession : IHttpHandler
    {

        public void ProcessRequest(HttpContext context)
        {
            context.Response.ContentType = "text/html";
            string strHtml = "";
            //读取用户名和密码
            string strUserName = context.Request.Form["txtUserName"];
            string strPwd = context.Request.Form["txtPassword"];
            if (strPwd == "123456")
            {
                //登陆成功,设置对应的键值对
                Guid id = Guid.NewGuid();   // 产生唯一的ID
                SessionMgr.SetKeyValue(id, strUserName);

                //id 保存在客户端cookie中
                HttpCookie loginCookie = new HttpCookie("LoginCookie");
                loginCookie.Value = id.ToString();
                loginCookie.Expires = DateTime.Now.AddDays(7);
                context.Response.Cookies.Add(loginCookie);

                //跳转到授权页面
                context.Response.Redirect("AuthorizationPage.ashx");

            }
            else
            {
                //登陆失败 , 加载登陆页面
                strHtml = Common_Nvelocity.RenderHTML("LoginSession.html", null);
                context.Response.Write(strHtml);

            }
        }

        public bool IsReusable
        {
            get
            {
                return false;
            }
        }
    }
}
View Code
C. Templates文件夹下添加LoginSession.html 登陆页面

<!DOCTYPE html>
<html xmlns="http://www.w3.org/1999/xhtml">
<head>
    <meta http-equiv="Content-Type" content="text/html; charset=utf-8" />
    <title></title>
</head>
<body>
    <form action="LoginSession.ashx" method="post">
        <table>
            <tr>
                <td>登陆名</td>
                <td>
                    <input type="text" name="txtUserName" /></td>
            </tr>
            <tr>
                <td>密码</td>
                <td>
                    <input type="password" name="txtPassword" /></td>
            </tr>
            <tr>
                <td>
                    <input type="submit" name="Login" value="登陆" /></td>
                <td></td>
            </tr>
        </table>

    </form>
</body>
</html>
View Code
D. 添加AuthorizationPage.ashx页面,只有登陆后的账户才有权限访问这个页面

using System;
using System.Collections.Generic;
using System.Linq;
using System.Web;

namespace HttpNoStatus.Templates
{
    /// <summary>
    /// AuthorizationPage 的摘要说明
    /// </summary>
    public class AuthorizationPage : IHttpHandler
    {

        public void ProcessRequest(HttpContext context)
        {
            context.Response.ContentType = "text/html";

            //抓取客户端 Cookie的ID值
            HttpCookie loginCookie = context.Request.Cookies["LoginCookie"];
            if (loginCookie != null)
            {
                Guid id = new Guid(loginCookie.Value);

                // 读取id对应的Value
                string strValue = SessionMgr.GetValue(id);

                //输出Value值,并提示该账号是已经登陆的账号
                context.Response.Write(strValue + ",您已经登陆本网站,有权限访问此页面");
            }

            //如果Cookie不存在,则直接跳转到登页面
            else
            {
                context.Response.Redirect("LoginSession.ashx");
            }
        }


        public bool IsReusable
        {
            get
            {
                return false;
            }
        }
    }
}
View Code
------------------------------------------------------------gif动画演示----------------------------------------------------------------

11,上面的示例是也就是Session原理。asp.net已经内置了Session机制,下面我们直接用ASP.NET Session实现 判断用户是否有登陆成功:
(一般处理程序HttpHandler操作Session, 要实现IRequiresSessionState接口)
分别添加页面: LoginSessionNew.ashx(登陆一般处理程序) , LoginSessionNew.html(登陆模板), AuthorizationPageNew.ashx(登陆后才有权限访问的页面)。
A,LoginSessionNew.ashx(登陆一般处理程序)

using System;
using System.Collections.Generic;
using System.Linq;
using System.Web;
using System.Web.SessionState;

namespace HttpNoStatus
{
    /// <summary>
    /// LoginSessionNew 的摘要说明
    /// </summary>
    public class LoginSessionNew : IHttpHandler, IRequiresSessionState
    {

        public void ProcessRequest(HttpContext context)
        {
            context.Response.ContentType = "text/html";
            string strHtml = "";
            //读取用户名和密码
            string strUserName = context.Request.Form["txtUserName"];
            string strPwd = context.Request.Form["txtPassword"];
            if (strPwd == "123456")
            {
                //登陆成功,直接保存Session值

                context.Session["LoginUserName"] = strUserName;


                //跳转到授权页面
                context.Response.Redirect("AuthorizationPageNew.ashx");

            }
            else
            {
                //登陆失败 , 加载登陆页面
                strHtml = Common_Nvelocity.RenderHTML("LoginSessionNew.html", null);
                context.Response.Write(strHtml);

            }
        }

        public bool IsReusable
        {
            get
            {
                return false;
            }
        }
    }
}
View Code
B,Templates模板下新建LoginSessionNew.html(登陆模板)

<!DOCTYPE html>
<html xmlns="http://www.w3.org/1999/xhtml">
<head>
    <meta http-equiv="Content-Type" content="text/html; charset=utf-8" />
    <title></title>
</head>
<body>
    <form action="LoginSessionNew.ashx" method="post">
        <table>
            <tr>
                <td>登陆名</td>
                <td>
                    <input type="text" name="txtUserName" /></td>
            </tr>
            <tr>
                <td>密码</td>
                <td>
                    <input type="password" name="txtPassword" /></td>
            </tr>
            <tr>
                <td>
                    <input type="submit" name="Login" value="登陆" /></td>
                <td></td>
            </tr>
        </table>

    </form>
</body>
</html>
View Code
C,AuthorizationPageNew.ashx(登陆后才有权限访问的页面)

using System;
using System.Collections.Generic;
using System.Linq;
using System.Web;
using System.Web.SessionState;

namespace HttpNoStatus
{
    /// <summary>
    /// AuthorizationPageNew 的摘要说明
    /// </summary>
    public class AuthorizationPageNew : IHttpHandler, IRequiresSessionState
    {

        public void ProcessRequest(HttpContext context)
        {
            context.Response.ContentType = "text/plain";
            //检查Session是否存在

            object obj = context.Session["LoginUserName"];

            if (obj != null)
            {
                //Session存在,读取Session值,并提示该账号是已经登陆的账号
                context.Response.Write(obj.ToString() + ",您已经登陆本网站,有权限访问此页面");
            }

            //如果Session不存在,则直接跳转到登页面
            else
            {
                context.Response.Redirect("LoginSessionNew.ashx");
            }
        }

        public bool IsReusable
        {
            get
            {
                return false;
            }
        }
    }
}
View Code
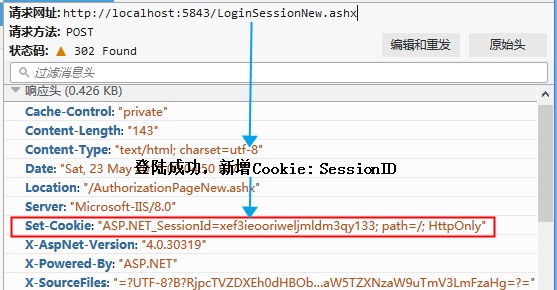
· ASP.NET内置Session机制同样实现了对用户是否登陆成功的判断:LoginSessionNew.ashx页面Headers中我们看到了Cookie中多了ASP.NET_SessionId
Session机制在客户端存放了ASP.NET_SessionID

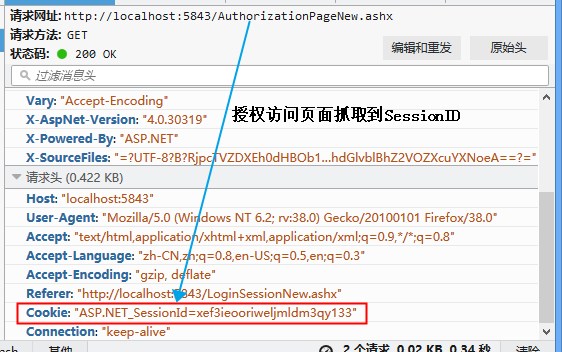
· 权限访问页面,请求头中读取到了客户端Cookie中的ASP.NET_SessionID

12, ASP.NET的Session机制: Session依赖于Cookie , 借助Cookie在客户端浏览器中记录了ID, 在服务器端存储了Value值。
13,Session的值是放到了服务器内存中,所以Session存放小数据。
Session(会话)有自动销毁机制,如果一段时间内浏览器没有和服务器交互,则Session会定时自动销毁。
登陆账号后,一段时间内如果不操作 系统就会自动退出,这就是Session自动销毁了。
Demo 下载
- 上一篇文章: 如何在ASP.NET5中使用ADO.NET
- 下一篇文章: MVC系列学习(十六)-区域的学习
- 基于WebForm+EasyUI的业务管理系统形成之旅
- 对.net orm工具Dapper在多数据库方面的优化
- Visual Studio 2012完美的拥抱GitHub
- .net调用存储过程碰到的一个问题
- winformtreeview通过节点名称添加子节点
- 用Asp.net实现基于XML的留言簿之一
- 使用DataList实现数据分页的技术
