- 阿里云主机网站备案详细流程及注意要点
- 草根站长对于网站三要素重新详解
- SugarHosts Windows VPS主机安装系统图文教程
- 网站换空间(搬家)的四点注意事项
- 该如何选择适合网站的空间?
- 为什么访问速度对网站起着如此大的作用
- Conoha.jp日本免费试用VPS主机和VPS主机性能测试体验
- 如何选择一个好的网站空间?
- Rsysnc安装、配置教程:实现VPS主机文件备份同步
- 快速搬空间,SSH的魅力
- Easypanel免费VPS主机面板的安装、使用等
- 网站更换服务器需注意的五步骤
- 网站更换新空间需要注意的几个问题
- 2014年最优秀免费主机空间排行榜TOP 10
- 分享站长选择网站空间的8大注意事项
- 新站该如何应对百度每周一次的大更新
- Moz专家:如何将五个网站迁移至一个新域名
- 如何最大程度的减少网站搬家带来的“阵痛”
- 网站流量偏低、网站权重上不去的三大原因
- 博客新手如何面对“免费空间”的诱惑
- Conoha.jp日本新加坡美国VPS主机申请、管理等
- 给新手站长的五个SEO建议
- 网站优化常见问答一:新站为什么不被收录
- 我一个在校大学生是如何建站的?
- 让ATBhost免费空间支持Discuz论坛的静态优化
- 新版OpenShift空间申请使用教程:安装WP、域名绑定等
- 如何来选择网站的服务器空间
- VPS主机搭建Ghost环境:Nginx Node.js MariaDB
- 作为新手我们应该如何选择自己的网站空间
- 分享影响网站用户体验的5大因素
VPS主机搭建Ghost环境:Nginx Node.js MariaDB

Ghost是一款个人博客系统,它是使用Node.js语言和MySQL数据库开发的,同时支持MySQL、MariaDB、SQLite和PostgreSQL。用户可以在支持Node.js的服务器上使用自己的博客。它是由两位WordPress前工程师开发,特点就是轻 快 高效,并原生支持Markdown语法。
在WordPress变得越来越强大,同时又越来越臃肿的今天,Ghost的出现,无疑为博客系统界带来一股清风。 虽然如此,Ghost目前的使用者还局限于有一定代码基础的Geek,工程师们,它并不完善。如果您想尝试一下Ghost博客的轻便快速,不妨跟随本文来进行一番尝试。
本文使用的环境如下: CentOS 6.6 x86_64纯净系统 。搭建目标如下:
1.nginx 1.9.2 编译SPDY模块 ;
2.node.js v0.12.4 ;
3.MariaDB 10.1.5(YUM快速安装) ;
4.安装并配置Ghost 0.6.3程序 。
更多的有关于博客系统搭建的信息可查看:静态博客程序使用入门
一、编译安装Nginx 1.9.2
1.首先我们去官方网站下载最新的nginx源码:
    cd /usr/local/src

    wget http://nginx.org/download/nginx-1.9.2.tar.gz
2.解压nginx源码:
tar xzvf nginx-1.9.2.tar.gz

cd nginx-1.9.2
3.编译openssl(为https准备,不需要请跳过该步骤)
yum update -y && yum install -y ncurses-devel make gcc bc
cd /usr/local/src
wget http://www.openssl.org/source/openssl-1.0.1h.tar.gz
tar zxvf openssl-1.0.1h.tar.gz
cd openssl-1.0.1h
./config
make
4.建立makefile(此处加入了https(--with-httpsslmodule)与spdy(--with-httpspdymodule)模块,若不需要请去掉)
#安装依赖环境
yum update -y && yum install pcre-devel zlib-devel
#编译nginx
./configure --user=www --group=www --prefix=/usr/local/nginx --with-http_stub_status_module --with-http_ssl_module --with-http_gzip_static_module --with-ipv6 --with-http_spdy_module --with-openssl=/usr/local/src/openssl-1.0.1h
useradd www -g www
make
make install
5.添加nginx管理脚本,设置开机启动
#!/bin/sh
#
# nginx - this script starts and stops the nginx daemon
#
# chkconfig:   - 85 15
# description:  Nginx is an HTTP(S) server, HTTP(S) reverse \
#               proxy and IMAP/POP3 proxy server
# processname: nginx
# config:      /etc/nginx/nginx.conf
# config:      /etc/sysconfig/nginx
# pidfile:     /var/run/nginx.pid

# Source function library.
. /etc/rc.d/init.d/functions

# Source networking configuration.
. /etc/sysconfig/network

# Check that networking is up.
[ "$NETWORKING" = "no" ] && exit 0

nginx="/usr/local/nginx/sbin/nginx"
prog=$(basename $nginx)

NGINX_CONF_FILE="/usr/local/nginx/conf/nginx.conf"

[ -f /etc/sysconfig/nginx ] && . /etc/sysconfig/nginx

lockfile=/var/lock/subsys/nginx

make_dirs() {
   # make required directories
   user=`$nginx -V 2>&1 | grep "configure arguments:" | sed 's/[^*]*--user=\([^ ]*\).*/\1/g' -`
   if [ -z "`grep $user /etc/passwd`" ]; then
       useradd -M -s /bin/nologin $user
   fi
   options=`$nginx -V 2>&1 | grep 'configure arguments:'`
   for opt in $options; do
       if [ `echo $opt | grep '.*-temp-path'` ]; then
           value=`echo $opt | cut -d "=" -f 2`
           if [ ! -d "$value" ]; then
               # echo "creating" $value
               mkdir -p $value && chown -R $user $value
           fi
       fi
   done
}

start() {
    [ -x $nginx ] || exit 5
    [ -f $NGINX_CONF_FILE ] || exit 6
    make_dirs
    echo -n $"Starting $prog: "
    daemon $nginx -c $NGINX_CONF_FILE
    retval=$?
    echo
    [ $retval -eq 0 ] && touch $lockfile
    return $retval
}

stop() {
    echo -n $"Stopping $prog: "
    killproc $prog -QUIT
    retval=$?
    echo
    [ $retval -eq 0 ] && rm -f $lockfile
    return $retval
}

restart() {
    configtest || return $?
    stop
    sleep 1
    start
}

reload() {
    configtest || return $?
    echo -n $"Reloading $prog: "
    killproc $nginx -HUP
    RETVAL=$?
    echo
}

force_reload() {
    restart
}

configtest() {
  $nginx -t -c $NGINX_CONF_FILE
}

rh_status() {
    status $prog
}

rh_status_q() {
    rh_status >/dev/null 2>&1
}

case "$1" in
    start)
        rh_status_q && exit 0
        $1
        ;;
    stop)
        rh_status_q || exit 0
        $1
        ;;
    restart|configtest)
        $1
        ;;
    reload)
        rh_status_q || exit 7
        $1
        ;;
    force-reload)
        force_reload
        ;;
    status)
        rh_status
        ;;
    condrestart|try-restart)
        rh_status_q || exit 0
            ;;
    *)
        echo $"Usage: $0 {start|stop|status|restart|condrestart|try-restart|reload|force-reload|configtest}"
        exit 2
esac
6、使用以上代码时,请注意代码的中英文字符在复制过程中是不是有变化。执行:vim /etc/init.d/nginx 。按I编辑,贴入上方脚本。按Esc,然后按:键,输入wq,回车保存。接着执行以下代码:
chkconfig --add /etc/init.d/nginx
service nginx start
chkconfig --level 2345 nginx on
6.nginx有关路径:nginx:/usr/local/nginx ,nginx.conf:/usr/local/nginx/conf/nginx.conf
二、yum快速安装MariaDB 10.1.5
1.添加MariaDB源:
cd /etc/yum.repos.d
vim MariaDB.repo
#输入如下内容
[mariadb]
name = MariaDB
baseurl = http://yum.mariadb.org/10.1.5/centos6-amd64/
gpgkey=https://yum.mariadb.org/RPM-GPG-KEY-MariaDB
gpgcheck=1
#保存退出
2.安装启动MariaDB
yum install MariaDB-server MariaDB-client MariaDB-devel
service mysql start
3.更改MariaDB root密码:/usr/bin/mysqladmin -u root password '你的密码'
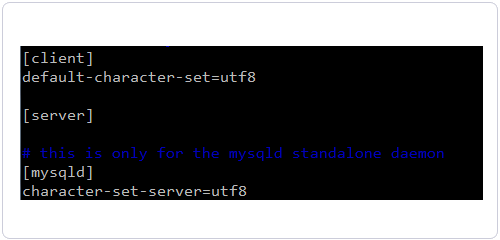
4.设置MariaDB字符集:
cd /etc/my.cnf.d
vim server.cnf
#在[mysqld]段下加入
character-set-server=utf8
#在[server]段上方输入
[client]
default-character-set=utf8
#保存退出
service mysql restart
5.编辑完后如下图:

5.建立ghost数据库
mysql -uroot -p你的密码
#MariaDB>表示在mysql客户端中输入
MariaDB>CREATE DATABASE ghost;
MariaDB>quit
6.MariaDB配置文件路径:my.cnf:/etc/my.cnf ,my.cnf引用:/etc/my.cnf.d
三、安装node.js v0.12.4
1.下载node.js二进制源码包(这个是编译好的程序,可直接使用,只要设置环境变量即可)
cd /usr/local
wget http://nodejs.org/dist/v0.12.4/node-v0.12.4-linux-x64.tar.gz
tar xzvf node-v0.12.4-linux-x64.tar.gz
cd node-v0.12.4-linux-x64
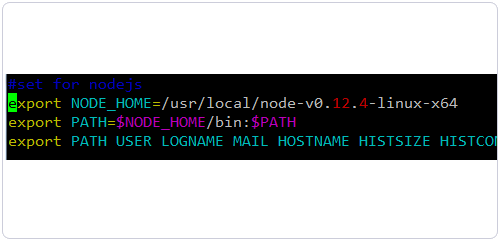
2.设置环境变量:
vim /etc/profile
#在export PATH USER LOGNAME MAIL HOSTNAME HISTSIZE HISTCONTROL上方加入
export NODE_HOME=/usr/local/node-v0.12.4-linux-x64
export PATH=$NODE_HOME/bin:$PATH
#保存退出
source /etc/profile
node -v #查看node.js版本
3.附图:编辑后的/etc/profile
